[popupwfancybox id=”6″]
In a previous post titled Simulating the Knowm M-MSS Memristor Model Using Qucs-S with Xyce, I presented the transient simulation of the basic AC sinusoidal response of the Knowm M-MSS (Mean Metastable-Switch Memristor) model implemented in Sandia National Laboratories’ Xyce Parallel Electronic Simulator. Today I’ll be discussing a collaborative effort to extend the Knowm OSS EDA suite by adding support for Knowm’s own JSpice SPICE-inspired simulator in Qucs – Quite Universal Circuit Simulator an open source circuit simulator which has been steadily growing in popularity. Both applications are available now for download under the GNU General Public License (GPLv3). Since 2014 a branch of the Qucs project called Spice4qucs also known as Qucs-S has provided the user with a simple schematic layout tool, algebraic equation manipulation, EDD (Equation-Defined Device) modeling, Verilog-A model synthesis and a range of other behavioral device modeling and post simulation analysis tools. The Qucs-S user interface can be used with several popular SPICE compatible simulators including Ngspice, SpiceOpus and Xyce. Now the latest release candidate of the Knowm Open Source EDA Stack includes extensions to Qucs-S to support Xyce and JSpice allowing simulations using Knowm’s latest Xyce compatible M-MSS Mean Meta-stable Switch Memristor model as described in The Mean Metastable Switch Memristor Model in Xyce. The M-MSS memristor model was recently added to JSpice along with Knowm’s original generalized MSS Metastable Switch Memristor model as described in the white paper Knowm Memristors, MSS Model and BEOL Service. These additional memristor models provide a SPICE compatible model and a stochastic behavioral model that capture the memory-enabling hysteresis behavior which is responsible for the memristive effect or “pinched” I-V response of the memristor. In this post I will be comparing the results of simulations of the M-MSS memristor model in JSpice with those previously obtained with Xyce and will provide additional information on JSpice usage and future development.
Prerequisites
Binaries of a new release candidate rc5 of the Knowm OSS EDA Stack are available for macOS 10.12 Sierra and Ubuntu 16.04 LTS (Xenial Xerus). This post covers installation and use on macOS. The included versions of Qucs-S (0.0.19S) and Xyce 6.7 have been built for use on amd64 architectures. Support for other architectures and operating systems are under development and will be released when available. JSpice is being delivered as an executable Java Archive .jar file. You will need to have Java installed on your computer before you can use the JSpice simulator. Here are the steps to get all the software installed and configured:
Download and install the latest release candidate #3 from these links.
MacOS Sierra 10.12 QUCs
MacOS Sierra 10.12 Knowm Examples JSpice
MacOS Sierra 10.12 Xyce
MacOS Sierra 10.12 JSpice
Linux QUCs
Linux Knowm Examples JSpice
Linux Xyce
Linux JSpice
You can download and install Java from Oracle Java SE Development Kit 8 Downloads:. I suggest downloading the latest version of the JDK 8 and get it configured on your computer. Although technically you only need the Java Runtime Environment the JDK installer includes the JRE. If you follow our blog regularly at some point you will need the Javac compiler installed. I’m going to show you how to install it and get it configured so you’ll be ready for some of our more advanced tutorials. For MacOS Sierra we will want to download the Mac OS X bundle.
- Select the
Accept License Agreementradio button. - Click on the
Mac OS X bundle–jdk-8u144-macosx-x64.dmglink to begin the download. - Once the download is complete, double-click on the
.dmgfile to start the installer. - Double-click on the package icon and follow the instructions to get the JDK installed on your computer.
- Check the version of Java just installed by opening a terminal window and typing:
|
1 2 |
% java -version |
Note: Java should return something like the following:
|
1 2 3 4 |
java version "1.8.0_144" Java(TM) SE Runtime Environment (build 1.8.0_144-b01) Java HotSpot(TM) 64-Bit Server VM (build 25.144-b01, mixed mode) |
For additional assistance in installing the JDK you can read through the documentation on the Oracle site JDK 8 Installation for OS X or better yet use Homebrew and type brew cask install java.
- Java applications use the
defaultJDK when being launched. If your version of the JDK is not set correctly then you can do the following:
- Set the
JAVA_HOMEenvironment variable in your.bash_profileso that Java applications (i.e. JSpice) knows where the JDK is located. Assuming you havenanoeditor installed you could enter the following:
|
1 2 |
% nano $HOME/.bash_profile |
Add…
|
1 2 |
export JAVA_HOME=/Library/Java/JavaVirtualMachines/1.8.0_144.jdk/Contents/Home |
Exit nano…
|
1 2 |
Crtl-X |
Alternatively you can use the java_home utility to set the default JDK by typing:
|
1 2 |
% /usr/libexec/java_home -v 1.8.0_144 --exec javac -version |
Install the latest Suite-Sparse from Homebrew
Xyce requires AMD and UMFPACK, which are installed as part of SuiteSparse package. The fftw library is also required to support FFT (Fast Fourier Transforms) and should also be installed using Homebrew.
Open a terminal window and type the following:
|
1 2 3 4 |
brew update brew install suite-sparse brew install fftw |
NOTE: The version of suite-sparse should be updated to 4.5.5_1 along with is dependency metis v.5.1.0. These are the latest versions available from the homebrew-core and are required dependencies for running the Xyce 6.7 software.
Check that suite-sparse is updated by typing:
|
1 2 |
brew info suite-sparse |
NOTE: You should observe something similar to the following:
|
1 2 3 |
suite-sparse: stable 4.5.5 (bottled) Suite of Sparse Matrix Software |
Install Xyce-6.7 Open_Source bundle
- Double click on the bundle
xyce_knowm_oss_eda-6.7-rc5.dmgto mount the bundle. - Copy or drag-n-drop the
xycefolder to/Applicationsfolder.
Install JSpice-1.0 bundle
- Double click on the bundle
jspice_knowm_oss_eda-1.0-rc5.dmgto mount the bundle. - Copy or drag-n-drop the
jspicefolder to/Applicationsfolder.
Install Qucs-0.0.19S bundle
- Double click on the bundle
qucs_knowm_oss_eda-0.0.19s-rc5.dmgto mount the bundle. - Copy or drag-n-drop the
qucsfolder to/Applicationsfolder. - Open the
qucsfolder that you just copied and the open thebinfolder. - Drag the
Qucs.appto the Launcher Bar.
Install Knowm Qucs-0.0.19S Memristor JSpice compatible example projects
Double click on the bundle examples_j_knowm_oss_eda-0.0.19s-rc5.dmg to mount the bundle.
Open a terminal window and type the following:
|
1 2 |
% mkdir ~/.qucs |
Copy or drag-n-drop all of the _prj folders from examples-j to your /Users//.qucs folder.
NOTE: These new example projects have circuits with JSpice compatible configurations. You should be able to them in both Xyce and JSpice simulators. They will be used to compare the simulated results that we will cover later in this tutorial.
Linux
NOTE: The release candidate Debian packages are currently being installed in the /usr/local under their own package directories to allow for side-by-side comparison of release candidates. The final release versions will be provided under a package manager and will use standard directories in /usr.
Install Java 8 JDK – Java Development Kit
Using apt-get and PPA
Update your system:
|
1 2 |
sudo apt-get update && sudo apt-get upgrade |
Install the software-properties-common package if you don’t already have it. This provides an easier way to add new repositories:
|
1 2 |
sudo apt-get install software-properties-common |
Add the Java PPA:
|
1 2 |
sudo add-apt-repository ppa:webupd8team/java |
This repository is not maintained by Oracle. It does not contain actual Java files, but does allow us to download installers for Oracle Java software. Before using the installers, you’ll be prompted to accept a license agreement, which can be found in its entirety here.
Update the local package cache:
|
1 2 |
sudo apt-get update |
Install the metapackage:
|
1 2 |
sudo apt-get install oracle-java8-installer |
This package will run an installer for The Oracle JDK 8, which is the current stable release. You may also replace java8 in the package name with java7 or java9 to install different versions, although these releases are not recommended for development.
You will be asked to accept the License Agreement
- Click
OK - Click
Yesto accept the license and begin the installation - Verify that Java and the Java compiler have been properly installed:
|
1 2 |
java -version |
As of this post, these commands should return the following:
java version “1.8.0_144”
Java(TM) SE Runtime Environment (build 1.8.0_144-b01)
Java HotSpot(TM) 64-Bit Server VM (build 25.144-b01, mixed mode)
|
1 2 |
javac -version |
javac 1.8.0_144
Since the PPA only provides an installer, and not updates for the JDK itself, you may want to delete it when you’re finished in order to keep your repositories organized:
|
1 2 |
sudo add-apt-repository -r ppa:webupd8team/java |
Set JAVA_HOME environment variable
Many applications include code or configuration that references the JAVA_HOME environment variable. This variable points them to the Java binary file, allowing them to run Java code.
To set the variable for your system:
|
1 2 |
echo "JAVA_HOME=$(which java)" | sudo tee -a /etc/environment |
Reload your system’s environment variables:
|
1 2 |
source /etc/environment |
Verify the variable was set correctly:
|
1 2 |
echo $JAVA_HOME |
This should return the path to the Java binary.
JAVA_HOME=/usr/bin/java
Install Xyce-6.7-Open_Source bundle
- Download the package
xyce-knowm-oss-eda-6.7-rc5.debto the$HOME/Downloadsdirectory. - Install using
dpkgthe following command$ sudo dpkg -i xyce-knowm-oss-eda-6.7-rc5.deb - Set the LD_LIBRARY_PATH variable
export LD_LIBRARY_PATH=/usr/local/xyce/serial/lib - Set the PATH variable
export PATH=/usr/local/xyce/serial/bin:$PATH - Test the install by typing
runxyce -v.
Install JSpice-1.0 bundle
- Double click on the bundle
jspice_knowm_oss_eda-1.0-rc5.debto mount the bundle. - Install using
dpkgthe following command$ sudo dpkg -i jspice-knowm-oss-eda-1.0-rc5.deb - Set the PATH variable
export PATH=/usr/local/jspice/bin:$PATH
Install Qucs-0.0.19S .deb package
- Download the package
qucs-knowm-oss-eda-0.0.19s-rc5.debto the$HOME/Downloadsdirectory. - Install using dpkg the following command
$ sudo dpkg -i qucs-knowm-oss-eda-0.0.19s-rc5.deb - Set the PATH variable
export PATH=/usr/local/qucs/bin:$PATH - Test the install by typing
qucs --version.
Execution should return Qucs 0.0.19 (f277f5c).
Install Knowm Qucs-0.0.19S Memristor JSpice compatible example projects
- Download the package
examples-j-knowm-oss-eda-0.0.19s-rc5.debto the$HOME/Downloadsdirectory. - Install using dpkg the following command
$ sudo dpkg -i examples-j-knowm-oss-eda-0.0.19s-rc5.deb - Copy or drag-n-drop all of the
_prjfolders fromexamples-jto your$HOME/.qucsfolder.
NOTE: These new example projects have circuits with JSpice compatible configurations. You should be able to them in both Xyce and JSpice simulators. They will be used to compare the simulated results that we will cover later in this tutorial.
Launch Qucs-S
- Click on the Qucs app icon on the Launcher Bar. NOTE: the first time Qucs is started is will inform you that no default simulator has been selected.
- Click
Okand then selectXyce (serial)as the default.
Qucs Application Settings
- Select
File / Application Settings...from the menu. - Click the
Locationstab.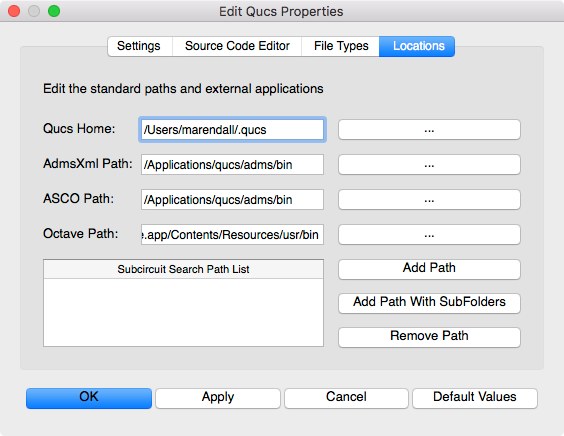
The Qucs Home will be set by default to a folder named .qucs in your home directory. This is where all projects will be stored for your installation. Each project will be stored in a separate sub-directory with the _prj suffix appended to the name you specify. Other directories such as the spice4qucs directory will also be created which will store the data and netlist information for your simulations.
Open the Ymemristor_J_prj Project File
- Select the
Projectstab on the left of the Main Dock. -
Double click the
Ymemristor_J_prjto automatically open theContenttab.
-
Click on the schematics list and then double-click on
knowm_mr_test.schto open the schematic diagram.
NOTE: The schematic should look like the following:
-
Double click on the
transient simulationsymbol to open the setup parameters dialog. -
Verify that
1001is set in the number value field which will give a 100 us step size.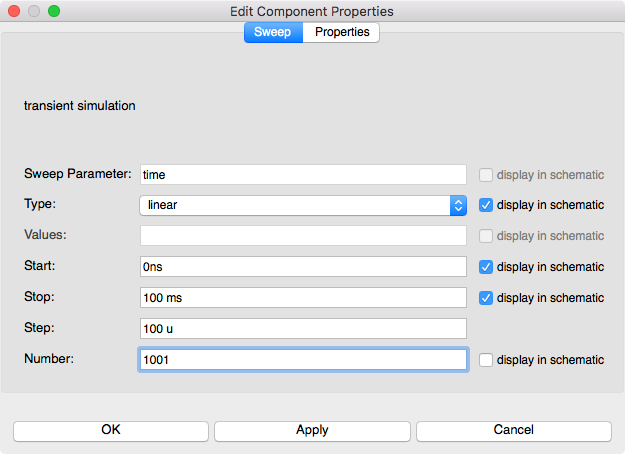
-
Click
Applyto save the changes. -
Click
OKto exit the properties dialog.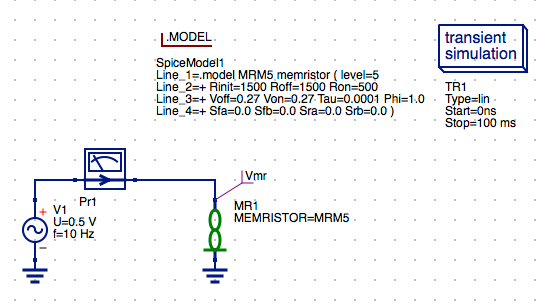
The Model and .Model Directive for the MR Memristor Component
The MR Memristor component is accompanied by several model directives that can be independently applied to each memristor symbol instance in the schematic diagram. These are selected from the Libraries tab. The MR Memristor component is used for multiple model definitions in Xyce or JSpice. These are selected by the level parameter of the model. The M-MSS (Meta Multi-stable Switch) Memristor model is defined as a level 5 model in Xyce and JSpice. The current KnowmMemristor model has been included in a separate library called the Knowm_Memristor_Technology library. To access this model do the following:
- Select the
Librariestab from the Main Dock. -
Left click on the
Knowm_Memristor_Technologyto expand the list.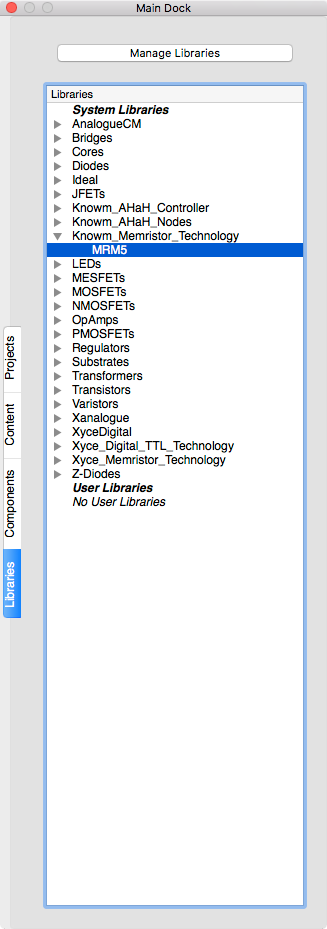
Notice: there is only one item,
MRM5listed in the library. -
This is the model that is currently assisgned to MR1 in the schematic.
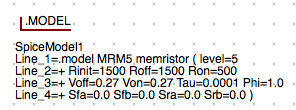
NOTE: The Rinit parameter that models the memristor’s initial resistance was previous defined for the circuit by specifying a .PARAM statement. The Rinit has now been added to the .MODEL parameters list. In practice this model parameter should be set equal to the Roff parameter value for most circuits. In future circuit simulations the Rinit parameter may be set to a random value for initialization of AHaH synapse nodes which will incorporate two memristors in series to model an AHaH kT-Synapse.
Set AC Voltage Source properties
- Double click on the
ac Voltage Sourcesymbol to open the parameters for the source.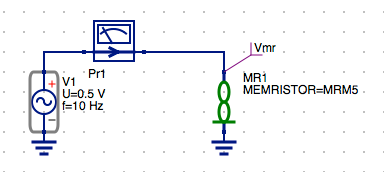
-
Select the
frow in the properties table. -
Change the
frequencyfrom10 Hzto100 Hz.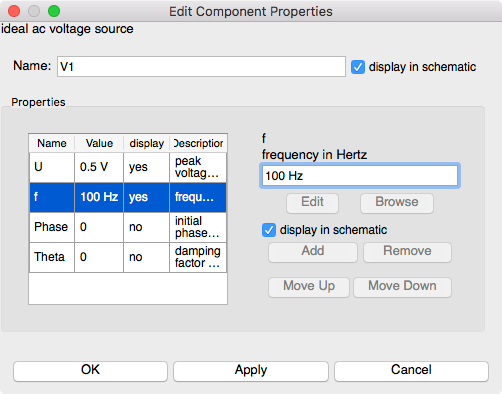
-
Verify the
display in schematiccheckbox is selected. -
Click
Applyto set the frequency value. -
Click
OKto exit the properties dialog.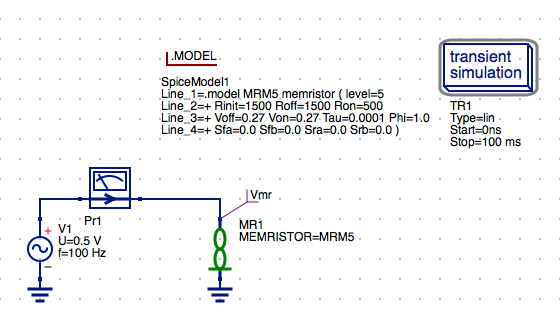
Save the Schematic Diagram File
- Click the
Savebutton on the toolbar to save the changes to the schematic.
Save Toolbar Button
Select Xyce (Serial) as the Default Simulator
-
Select
Simulate / Select default simulator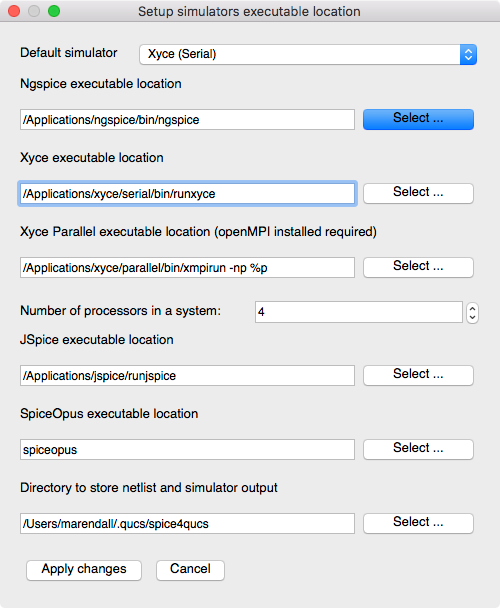
-
Verify the
Xyce executable locationis set to/Applications/xyce/serial/bin/runxyceNOTE: After changing the default simulator you will receive a warning to restart Qucs. This is not always necessary unless you want to make the selected simulator the new default for the project. For now just proceed and we will discuss this in more detail below in the
General Notes on Usage.
-
Click
Apply Changes
Run a Xyce Simulation
-
Select
Simulation / Simulateon the main menu or selectSimulatebutton on the toolbar.

Run Simulation Toolbar Button
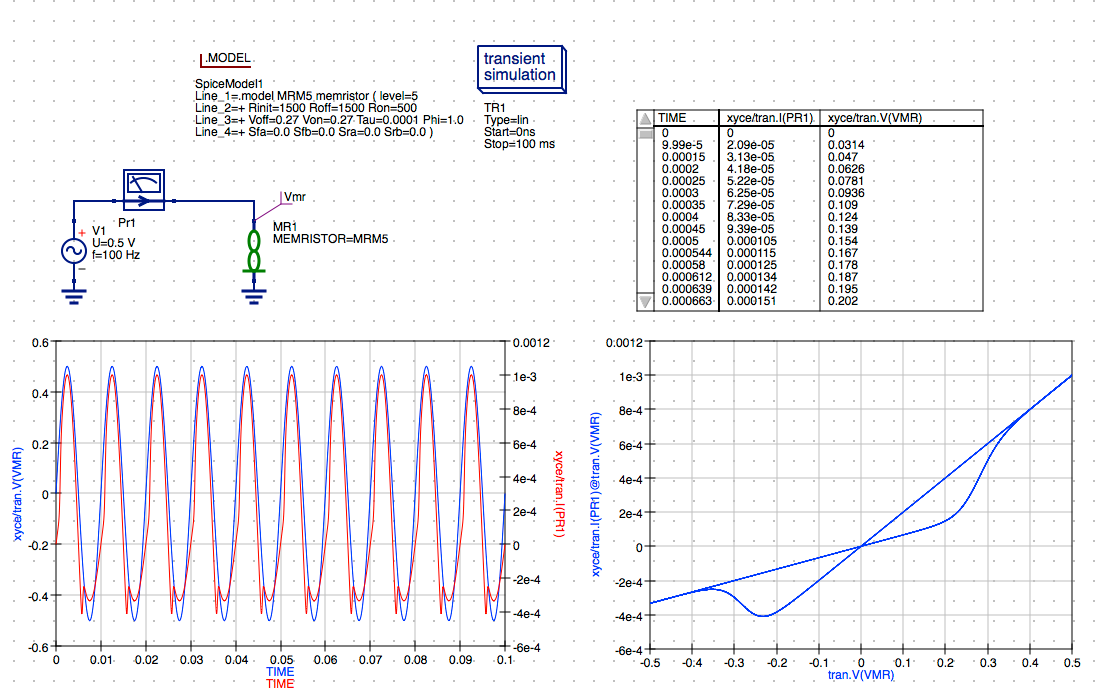
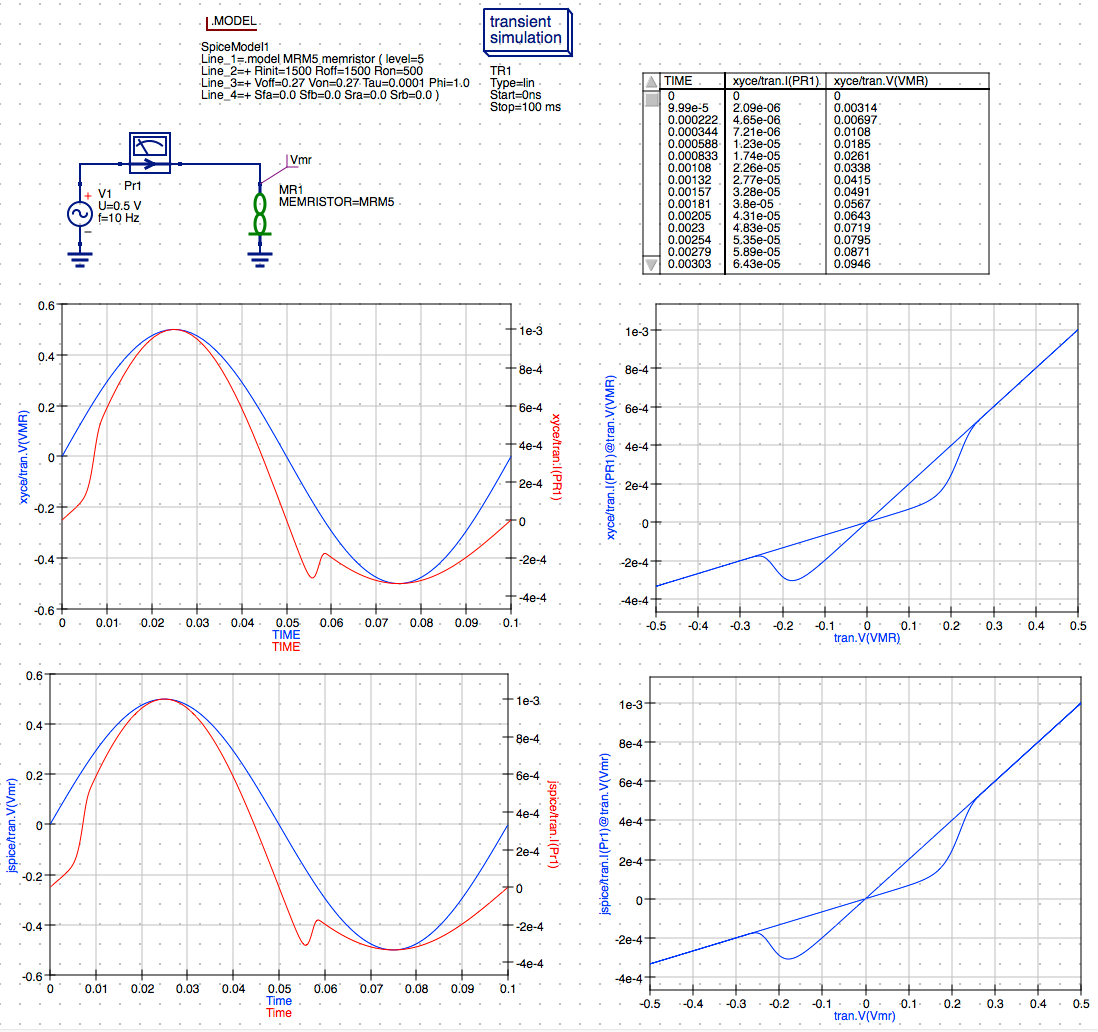
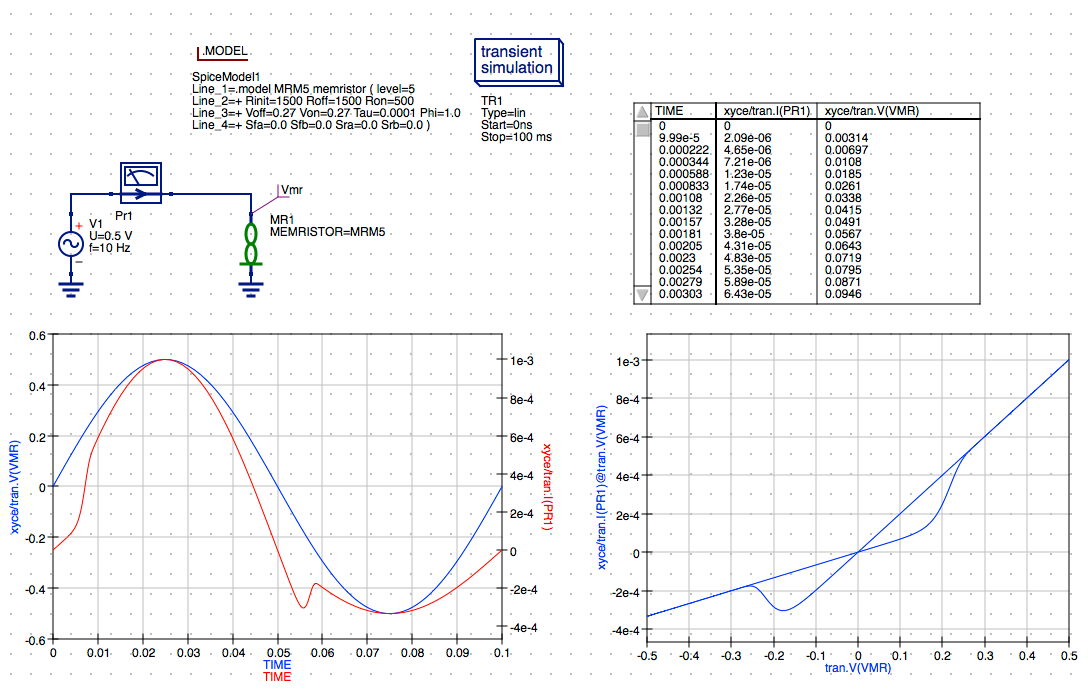
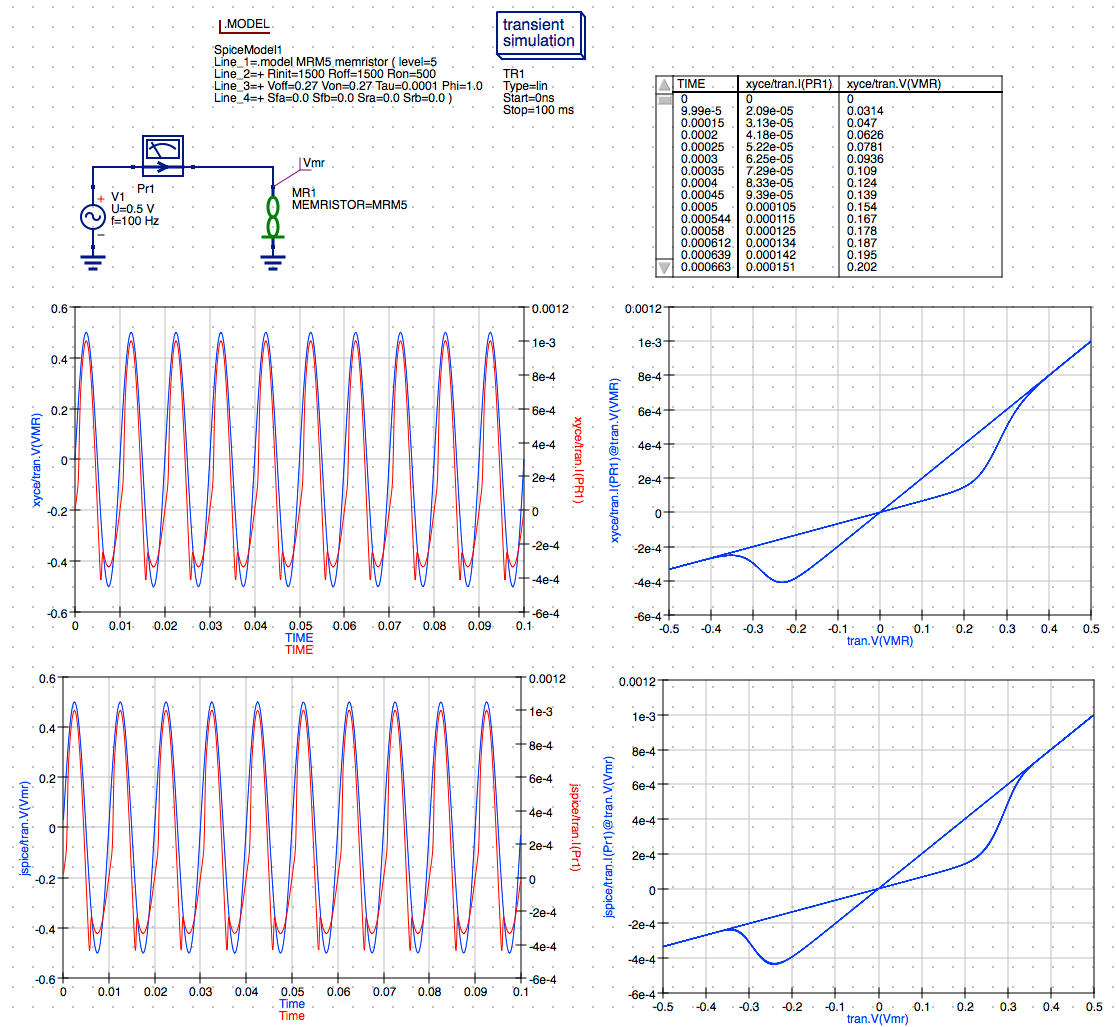
NOTE: The simulation results are returned from Xyce and the plots are updated automatically.
-
Check simulation for
errorsorwarnings. See the status bar at the bottom of the Qucs windowlower right corner.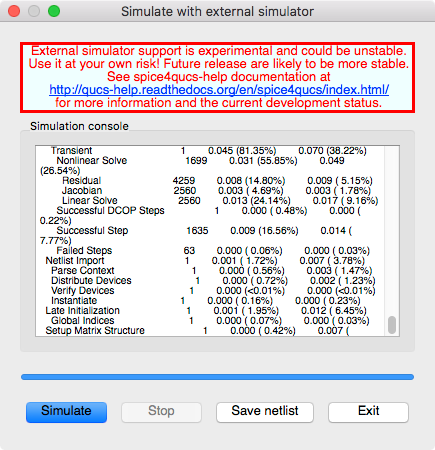
-
If you want to save the current netlist, use the
Save netlistbutton on the external simulator window to open the file save dialog. Specify the name of the netlist to save, typically the schematic’s filename with the extension.cirinstead of.sch. The resulting file will be saved in the project folder and you can open the.cirfile under theOtherslist in the project tree.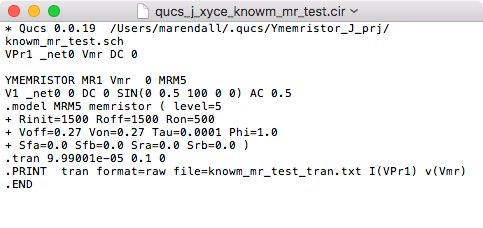
NOTE: The
F6key orShow Last Netlistfrom the Simulations menu currently only displays the last netlist for the latest Qucsator simulation. -
Click the
Exitbutton to close theSimulationwindow. -
You can view any messages written by the simulator by clicking the
F5key or selectingShow Last Messagesfrom the Simulations menu.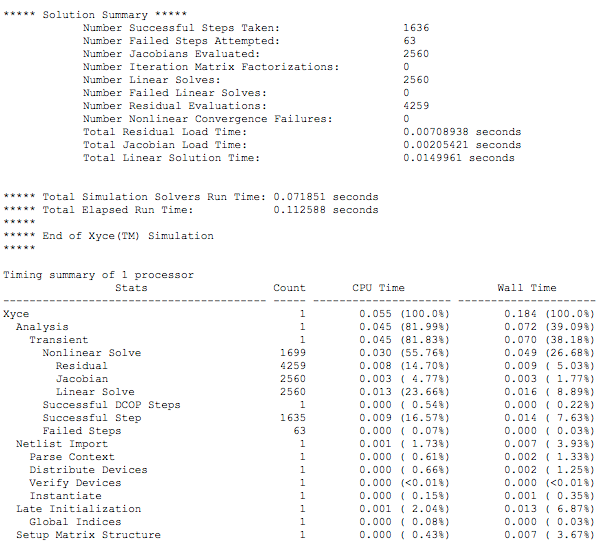
-
The
Qucsdata fileknowm_mr_test.dat.xyceproduced by the transient simulation will be automatically created in the$HOME/.qucs/Ymemristor_J_prj/directory.
Select JSpice as the Default Simulator
-
Select
Simulate / Select default simulator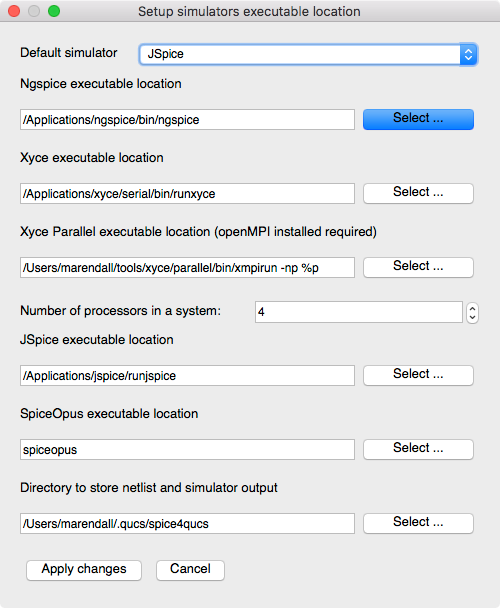
-
Verify the
JSpice executable locationis set to/Applications/jspice/runjspiceNOTE: After changing the default simulator you will receive a warning to restart Qucs. This is not always necessary unless you want to make the selected simulator the new default for the project. For now just proceed and we will discuss this in more detail below in the
General Notes on Usage. -
Click
Apply Changes
Run a JSpice Simulation
-
Select
Simulation / Simulateon the main menu or selectSimulatebutton on the toolbar.
Run Simulation Toolbar Button
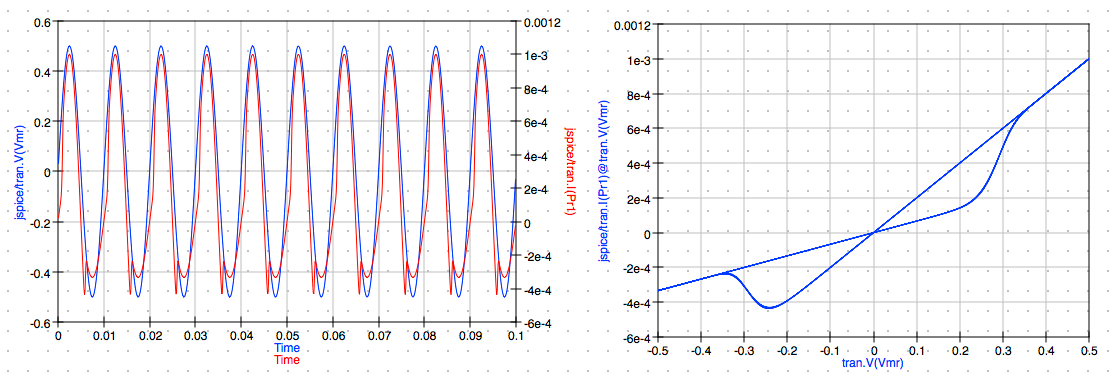
NOTE: The simulation results are returned from JSpice and the plots are updated automatically. The results are very close to those obtained from the previous Xyce simulation.
-
Check simulation for
errorsorwarnings. See the status bar at the bottom of the Qucs windowlower right corner.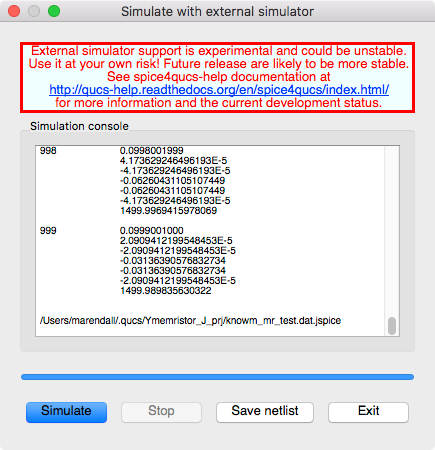
-
Again, if you want to save the current netlist, use the
Save netlistbutton on the external simulator window to open the file save dialog. Specify the name of the netlist to save, typically the schematic’s filename with the extension.cirinstead of.sch. The resulting file will be saved in the project folder and you can open the.cirfile under theOtherslist in the project tree.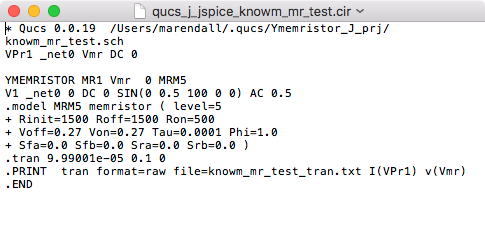
-
Click the
Exitbutton to close theSimulationwindow. -
You can view any messages written by the simulator by clicking the
F5key or selectingShow Last Messagesfrom the Simulations menu.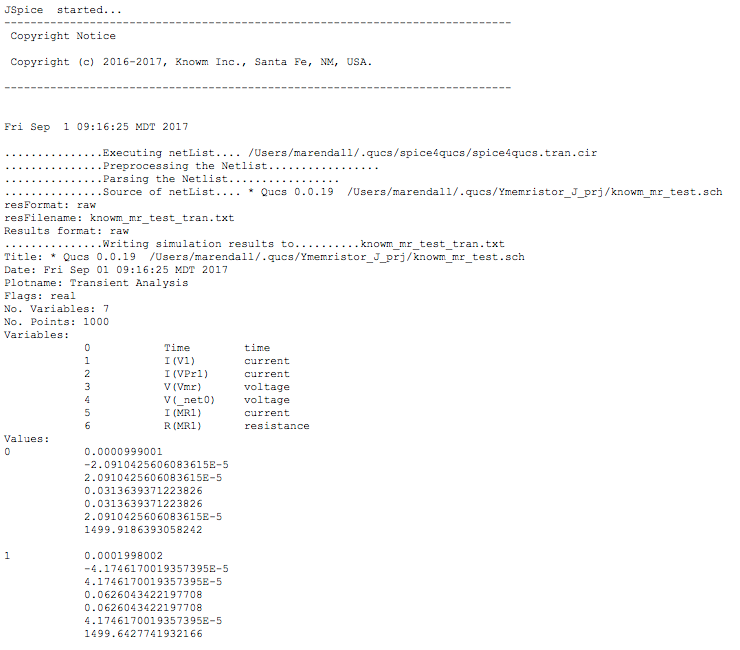
-
The
Qucsdata fileknowm_mr_test.dat.jspiceproduced by the transient simulation will be automatically created in the$HOME/.qucs/Ymemristor_J_prj/directory.
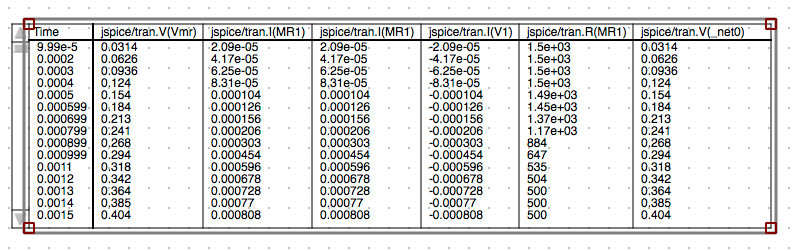
Check JSpice Tabular Results
-
You can scroll through the data values for all data vectors returned from JSpice using the tabular diagram slider control.
General Notes on Usage
Default simulator selection
When selecting a new default simulator, if you want the change to be persistent after closing Qucs-S then you need to do the following steps.
- Select
Simulation / Select default simulator -
Select the simulator in the
Default simulatordrop-down list. -
Click
Apply changes -
Select
File / Application Settings -
Click
Applyto save the settings. -
Click
OKto exit the dialog. -
Select
Qucs / Quit Qucs
NOTE: Several of the features of the Qucs-S user interface are displayed based on the Default simulator which is saved in the QucsSettings file updated when you save the Application Settings for the program. If you don’t perform the steps outlined above before closing Qucs-S then the Default simulator selection will not be saved and the will not be set when reopening Qucs-S. This issue should be corrected in a future version of the software.
Conclusion
That completes this comparison of Xyce vs. JSpice simulation of the M-MSS memristor model using Qucs-S to define a simple transient simulation for the sinusoidal response of a discrete memristor. I will be presenting the additional capabilities and comparisons with Xyce in follow-on posts including the M-MSS model’s pulse response for discrete memristors and Knowm AHaH synapse circuits.
JSpice is still under development and we will be adding features that are most useful to our mission to provide OSS EDA tools to those of you who are interested in developing neuromorphic circuits using memristor-based synapses. We will be accepting feedback and will be building a wish list for additional requested features for JSpice that may be found in other SPICE compatible simulators. Please leave a comment or send us e-mail through the knowm.org site’s contact page.
You should also checkout the documentation and other examples listed in the Qucs 0.0.19 and Qucs-S 0.0.19 documentation available on the web at the following URLs.
- JSpice GitHub repository
- Qucs 0.0.19 Help: https://qucs-help.readthedocs.io/en/0.0.19/subcircuit.html
- Qucs-S 0.0.19 Help: https://qucs-help.readthedocs.io/en/spice4qucs/SPICEComp.html
- Qucs-S Bugtracker: https://github.com/ra3xdh/qucs/issues
- Qucs-S Sub-project Home Webpage: https://ra3xdh.github.io/
Other References
- What is Qucs?
- What can all be installed from Sourceforge?
- Qucs Website: http://qucs.sourceforge.net/
- Main Repository: https://sourceforge,net/p/qucs/git/ci/master/tree/
- Mirror Repository: https://github.com/Qucs/qucs
- Mailing lists: http://sourceforge.net/p/qucs/mailman/
- Forum: http://sourceforge.net/p/qucs/discussion/
- Bug trackers:
- Source code documentation:
- Wiki: https://github.com/Qucs/qucs/wiki


1 Comment
JP
Thanks a lot for the details provided,
Ive tried on OSX Catalina but not working due to some script to align & links to create
Here is my advice to make it work under Catalina
1/ add export DYLD_LIBRARY_PATH=/Applications/xyce/serial/lib in .bash_profile
2/ change path in scripts /applications/qucs/bin/qucs (ie /Applications/qucs/bin/qucs.app/Contents/MacOS/qucs)
3/ create a icon pointing to this script/applications/qucs/bin/qucs ( not using global App icon !!! other library will not work)
4/ add following symbolic link
cd /usr/local/opt/suite-sparse/lib/
ln -s libumfpack.5.7.9.dylib libumfpack.5.7.6.dylib
cd /usr/local/opt/suite-sparse/lib/
ln -s libcholmod.3.0.14.dylib libcholmod.3.0.11.dylib
cd /usr/local/opt/suite-sparse/lib/
ln -s libsuitesparseconfig.5.7.2.dylib libsuitesparseconfig.4.5.5.dylib
Enjoy !
( Thanks Alex & Michael for your support)