Xyce is a new (relative to the original SPICE) circuit simulator from Sandia National Laboratories that is SPICE-compatible but operates in a fundamentally different way under the hood. Xyce boasts a modern code base, an active forum, supports large-scale parallel computing architectures to accelerate simulations and it’s open source too! We have recently adopted Xyce in order to further develop several memristor models including our own The Generalized Metastable Switch Memristor Model, as Xyce is able to integrate Verilog-A models into Xyce-compatible C++ code using the ADMS model compiler with the Xyce/ADMS back-end. In this blog post I demonstrate how to build Xyce from source so that it is able to do the Verilog-A model integration via the plug-in mechanism. I am using Xyce 6.6, MacOS Sierra, Trilinos-12.6.4, Homebrew and gcc6. Other systems such as Linux and Windows would need to slightly modify these instructions, but the basic idea should be very similar.
Install Xyce the Easy Way
It is possible to install a Xyce binary forgoing the process of building it yourself. You won’t be able to integrate Verilog-A models into Xyce though. Compiled binaries of Xyce for most platforms can be found at https://xyce.sandia.gov/downloads/Binaries.html.
Install Xyce the Hard Way – Build from Source
First download the source (requires registration).
Dependencies with Homebrew
Required for running regression test scripts (see below)
|
1 2 3 4 5 |
brew install python brew install homebrew/python/numpy brew install scipy brew install matplotlib |
Required for building Xyce and Dependencies
|
1 2 3 4 5 6 |
brew install homebrew/versions/gcc6 brew install fftw brew install homebrew/science/suite-sparse brew install cmake brew install flex |
ADMS – An Automatic Device Model Synthesizer
ADMS is a code generator that converts electrical compact device models specified in high-level description language into ready-to-compile C code for the API of SPICE simulators. Based on transformations specified in XML language, ADMS transforms Verilog-AMS code into other target languages.
Building ADMS with Autotools will require some further Perl modules
|
1 2 |
brew install gd |
Install into system-wide Perl
|
1 2 |
sudo cpan -f GD |
Let’s assume we have a directory for installing all the EDA tools called ~/workspaces/workspace_eda.
|
1 2 3 4 5 6 7 8 9 |
cd ~/workspaces/workspace_eda git clone https://github.com/Qucs/ADMS.git ADMS cd ADMS ./bootstrap.sh ./configure --enable-maintainer-mode sudo make install admsXml -v |
Xyce ( Serial ) Build Instructions
Xyce Dependencies – Trilinos-12.6.4 ( Serial )
|
1 2 3 |
cd ~/workspaces/workspace_eda git clone -b trilinos-release-12-6-branch https://github.com/trilinos/Trilinos.git Trilinos-12.6.4 |
Setup out of source build directory ( Serial )
|
1 2 3 4 5 6 7 |
cd Trilinos-12.6.4 mkdir build cd build mkdir serial cd serial |
Create a config script
|
1 2 |
nano ./reconfigure |
|
1 2 3 4 5 6 7 8 9 10 11 12 13 14 15 16 17 18 19 20 21 22 23 24 25 26 27 28 29 30 31 32 33 34 35 36 37 38 39 40 41 42 43 44 45 46 |
#!/bin/bash SRCDIR=$HOME/workspaces/workspace_eda/Trilinos-12.6.4 ARCHDIR=$HOME/workspaces/workspace_eda/XyceLibs/Serial CXXFLAGS="-O3 -arch x86_64 -mmacosx-version-min=10.12 -fPIC" CFLAGS="-O3 -arch x86_64 -mmacosx-version-min=10.12 -fPIC" FFLAGS="-arch x86_64 -mmacosx-version-min=10.12" LINK_FLAGS="-arch x86_64 -macosx_version_min 10.12" /usr/local/bin/cmake \ -G "Unix Makefiles" \ -DCMAKE_C_COMPILER=/usr/local/bin/gcc-6 \ -DCMAKE_CXX_COMPILER=/usr/local/bin/g++-6 \ -DCMAKE_Fortran_COMPILER=/usr/local/bin/gfortran-6 \ -DCMAKE_CXX_FLAGS="$CXXFLAGS" \ -DCMAKE_C_FLAGS="$CFLAGS" \ -DCMAKE_Fortran_FLAGS="$FFLAGS" \ -DCMAKE_INSTALL_PREFIX=$ARCHDIR \ -DCMAKE_MAKE_PROGRAM="make" \ -DTrilinos_ENABLE_NOX=ON \ -DNOX_ENABLE_LOCA=ON \ -DTrilinos_ENABLE_EpetraExt=ON \ -DEpetraExt_BUILD_BTF=ON \ -DEpetraExt_BUILD_EXPERIMENTAL=ON \ -DEpetraExt_BUILD_GRAPH_REORDERINGS=ON \ -DTrilinos_ENABLE_TrilinosCouplings=ON \ -DTrilinos_ENABLE_Ifpack=ON \ -DTrilinos_ENABLE_Isorropia=ON \ -DTrilinos_ENABLE_AztecOO=ON \ -DTrilinos_ENABLE_Belos=ON \ -DTrilinos_ENABLE_Teuchos=ON \ -DTeuchos_ENABLE_COMPLEX=ON \ -DTrilinos_ENABLE_Amesos=ON \ -DAmesos_ENABLE_KLU=ON \ -DAmesos_ENABLE_UMFPACK=ON \ -DTrilinos_ENABLE_ROL=ON \ -DTrilinos_ENABLE_Sacado=ON \ -DTrilinos_ENABLE_Kokkos=OFF \ -DTrilinos_ENABLE_ALL_OPTIONAL_PACKAGES=OFF \ -DTPL_ENABLE_AMD=ON \ -DAMD_LIBRARY_DIRS="/usr/local/opt/suite-sparse/lib" \ -DTPL_AMD_INCLUDE_DIRS="/usr/local/opt/suite-sparse/include" \ -DTPL_ENABLE_UMFPACK=ON \ -DUMFPACK_LIBRARY_DIRS="/usr/local/opt/suite-sparse/lib" \ -DTPL_UMFPACK_INCLUDE_DIRS="/usr/local/opt/suite-sparse/include" \ -DTPL_ENABLE_BLAS=ON \ -DTPL_ENABLE_LAPACK=ON \ $SRCDIR |
Save script and change mode to executable
|
1 2 |
sudo chmod 755 ./reconfigure |
Configure, Build and Install ( output creates ~/workspaces/workspace_eda/XyceLibs/Serial )
|
1 2 3 4 |
./reconfigure make sudo make install |
Download the 3 Xyce_6.6 tarballs from Sandia National Labs and copy to ~/workspaces/workspace_eda
|
1 2 |
cd ~/workspaces/workspace_eda |
Extract the folders
|
1 2 3 4 |
tar xvf Xyce-6.6.tar.gz tar xvf Xyce_Regression-6.6.tar.gz tar xvf Xyce_Docs-6.6.tar.gz |
Build Xyce ( Serial ) with advanced features using XyceLibs ( Serial )
Setup an out of source build directory
|
1 2 3 4 5 6 7 |
cd ~/workspaces/workspace_eda/Xyce-6.6 mkdir build cd build mkdir serial cd serial |
Create a config script
Here we take the script given on the Xyce building guide and modify it to our system and preferences. We add ADMS_CXXFLAGS="-O1" to reduce the optimization of the ADMS components which will vastly improve compile times. We also add --disable-adms_sensitivities to turn off analytic sensitivity derivative calculation for Verilog-A-derived devices. These and more optimization tips can be found on the build guide in section Special note for building on small-memory computer systems. You must configure Xyce using the --enable-shared and --enable-xyce-shareable option in order to integrate your own Verilog-A/ADMS models.
|
1 2 |
nano ./reconfigure |
|
1 2 3 4 5 6 7 8 9 10 11 12 13 14 15 16 |
../../configure \ ARCHDIR="$HOME/workspaces/workspace_eda/XyceLibs/Serial" \ --disable-fortran_test \ --disable-silent-rules \ --enable-shared \ --enable-xyce-shareable \ --disable-adms_sensitivities \ CC=/usr/local/bin/gcc-6 \ CXX=/usr/local/bin/g++-6 \ F77=/usr/local/bin/gfortran-6 \ LEX=/usr/local/opt/flex/bin/flex \ CXXFLAGS="-O3 -g -std=c++11 -arch x86_64 -mmacosx-version-min=10.12" \ ADMS_CXXFLAGS="-O1" \ CPPFLAGS="-arch x86_64 -mmacosx-version-min=10.12 -I/usr/include -I/usr/local/include -I/usr/local/opt/flex/include -I/usr/local/Cellar/gcc/6.2.0/lib/gcc/6/gcc/x86_64-apple-darwin16.0.0/6.2.0/include" \ F77FLAGS="-arch x86_64 -mmacosx-version-min=10.12 -I/usr/include -I/usr/local/include -I/usr/local/opt/flex/include -I/usr/local/Cellar/gcc/6.2.0/lib/gcc/6/gcc/x86_64-apple-darwin16.0.0/6.2.0/include" \ LDFLAGS="-Wl,-framework,Accelerate -L/usr/local/lib -L/usr/local/opt/flex/lib -L/usr/local/Cellar/gcc/6.2.0/lib/gcc/6" |
Save script and change mode to executable
|
1 2 |
sudo chmod 755 ./reconfigure |
Configure and build
|
1 2 |
./reconfigure |
Lets’ first check how many cores we have (MacOS):
|
1 2 |
sysctl -n hw.ncpu |
Use the -j option to define the number of cores compiling should use, in this case 4.
|
1 2 |
make -j4 |
If you get permissions errors in ~/workspaces/workspace_eda/Xyce-6.6/build/serial/src when trying to recompile, run:
|
1 2 3 |
cd ~/workspaces/workspace_eda/Xyce-6.6/build/serial/src chown you:yourgroup .libs -R |
For me it was:
|
1 2 |
sudo chown -R timmolter:staff ~/workspaces/workspace_eda/Xyce-6.6/build/serial/src/.libs |
Run regression tests before installing
|
1 2 |
cd ~/workspaces/workspace_eda/Xyce-6.6/build/serial |
Create a config script
|
1 2 |
nano ./regression |
|
1 2 3 4 5 6 |
$HOME/workspaces/workspace_eda/Xyce_Regression-6.6/TestScripts/run_xyce_regression \ --output=`pwd`/Xyce_Test \ --xyce_test="$HOME/workspaces/workspace_eda/Xyce_Regression-6.6" \ --resultfile=`pwd`/serial_results \ --taglist="+serial+nightly?noverbose?klu-verbose?fft" \ `pwd`/src/Xyce |
Save script and change mode to executable
|
1 2 |
sudo chmod 755 ./regression |
Run tests ( NOTE: A few tests may fail depending on the availability of some features and prerequisites )
|
1 2 |
./regression |
Install Xyce ( Serial ) outputs Xyce binary & buildxyceplugin to /usr/local/bin
|
1 2 3 4 5 |
cd ~/workspaces/workspace_eda/Xyce-6.6/build/serial sudo make install Xyce -v Xyce -h |
Read the Xyce User Guide and start simulating!
Xyce ( Parallel ) Build Instructions
Building Trilinos for use in Parallel Xyce requires enabling some additional Trilinos packages (Zoltan and ShyLU) and enabling ParMETIS library support. It also requires using the compiler wrappers provided by your system’s MPI package (ex. Open MPI) instead of the compilers (gcc, g++, gfortran) directly. These wrappers are typically called “mpicc,” “mpic++”, and “mpif77”, but your system may install them with different names or special paths.
To build for parallel, follow the instructions here, making slight modifications to the above instructions. You can use a diff tools to see the differences that need to be applied.
Additional Xyce Dependencies with Parallel support
|
1 2 3 |
brew install open-mpi brew install parmetis --build-from-source |
Example Circuit for Testing
This is taken from the user manual linked to above.
|
1 2 3 4 5 6 7 8 9 10 11 12 13 14 15 16 17 18 19 20 21 22 23 24 25 26 27 28 29 30 31 32 33 34 35 36 37 38 39 40 |
Diode clipper circuit with transient analysis statement * * Voltage Sources VCC 1 0 5V VIN 3 0 SIN(0V 10V 1kHz) * Analysis Command .TRAN 2ns 2ms * Output .PRINT TRAN V(3) V(2) V(4) * Diodes D1 2 1 D1N3940 D2 0 2 D1N3940 * Resistors R1 2 3 1K R2 1 2 3.3K R3 2 0 3.3K R4 4 0 5.6K * Capacitor C1 2 4 0.47u * * GENERIC FUNCTIONAL EQUIVALENT = 1N3940 * TYPE: DIODE * SUBTYPE: RECTIFIER .MODEL D1N3940 D( + IS = 4E-10 + RS = .105 + N = 1.48 + TT = 8E-7 + CJO = 1.95E-11 + VJ = .4 + M = .38 + EG = 1.36 + XTI = -8 + KF = 0 + AF = 1 + FC = .9 + BV = 600 + IBV = 1E-4) * .END |
|
1 2 |
Xyce /path/to/.../clipper.cir |
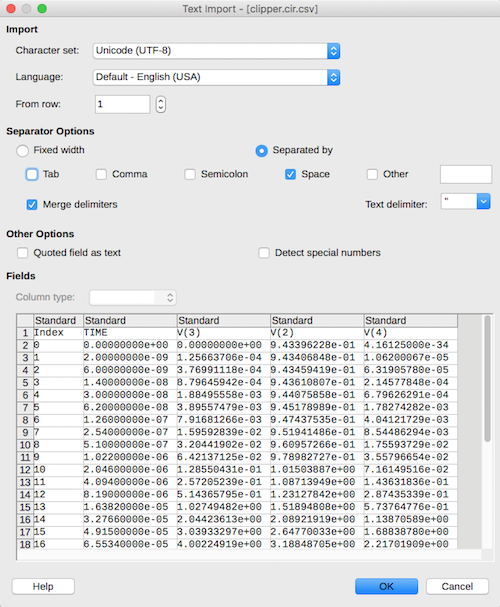
Xyce will run the simulation and create a .prn file. Xyce does not have it’s own graphical system for displaying results and a third party tool is necessary. They recommend gnuplot and Tecplot. To get a quick and dirty plot with the software I already had installed, I changed the .prn file to a .csv file and imported it into Libreoffice.
Xyce Hello World CSV
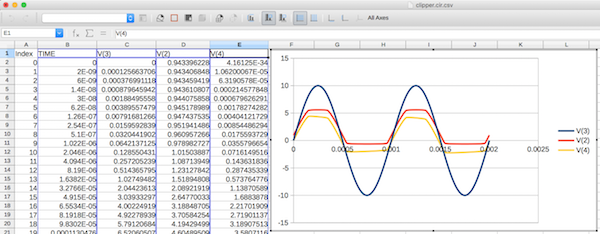
Xyce Hello World Tran
Joglekar Resistance Switch Memristor Model
Having previously simulated a memristor in LTSpice using the Joglekar nonlinear drift window function, we adapt that netlist to the required syntax of Xyce.
The following code can be found on the memristor-models-4-all project.
|
1 2 3 4 5 6 7 8 9 10 11 12 13 14 15 16 17 18 19 20 21 22 23 24 25 26 27 28 29 30 31 32 33 34 35 36 37 38 39 40 41 42 43 44 45 46 47 48 49 50 51 52 53 54 55 56 57 58 59 60 61 62 63 64 65 |
*********************************************** * HP Memristor SPICE Model * For Transient Analysis only * created by Zdenek and Dalibor Biolek *********************************************** * Ron, Roff - Resistance in ON / OFF States * * Rinit - Resistance at T=0 * * D - Width of the thin film * * uv - Migration coefficient * * p - Parameter of the WINDOW-function for * modeling nonlinear boundary conditions * * x - W/D Ratio, W is the actual width * of the doped area (from 0 to D) * *********************************************** .SUBCKT memristor plus minus PARAMS: + Ron=100 Roff=16K Rinit=11K D=10N uv=10F p=1 *********************************************** * DIFFERENTIAL EQUATION MODELING * *********************************************** Gx 0 x value={I(Emem)*uv*Ron/D**2*f(V(x),p)} Cx x 0 1 IC={(Roff-Rinit)/(Roff-Ron)} Raux x 0 1000000 *********************************************** * RESISTIVE PORT OF THE MEMRISTOR * *********************************************** Emem plus aux value={-I(Emem)*V(x)*(Roff-Ron)} Roff aux minus {Roff} *********************************************** * FLUX COMPUTATION * *********************************************** Eflux flux 0 value={SDT(V(plus,minus))} *********************************************** * CHARGE COMPUTATION * *********************************************** Echarge charge 0 value={SDT(I(Emem))} *********************************************** * WINDOW FUNCTIONS * FOR NONLINEAR DRIFT MODELING * *********************************************** * window function, according to Joglekar .func f(x,p) {1-(2*x-1)**(2*p)} .ENDS memristor XMemristor N001 0 memristor V1 N001 0 SIN(0V 1.2V 1Hz) * Analysis Command .TRAN .01ns 3s * Output .PRINT TRAN FORMAT=CSV V(N001) {-1* I(V1)} .end |
Note that we added the option FORMAT=CSV to directly get a CSV file as output so we don’t have to manually change the file extension before importing it into LibreOffice. Following is the familiar pinched hysteresis loop response of the memristor in response to a sinusoidal input.
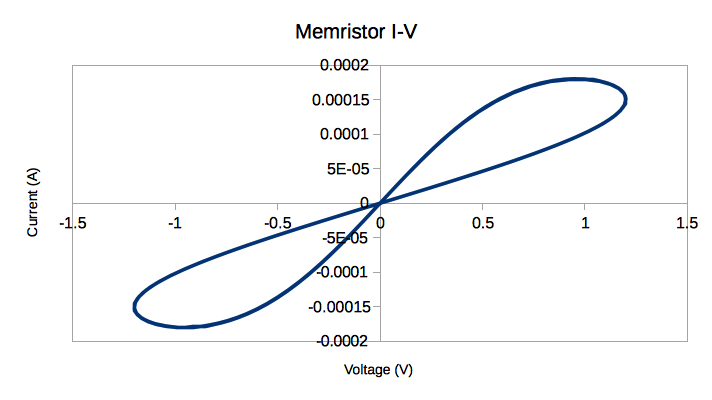
Xyce Memristor I-V
Plotting with GNUPlot
The official Xyce manual states that GNUPlot is a popular choice for plotting the results of a simulation. As using LibreOffice is quite slow and cumbersome and GNUPlot could be wrapped into a script, we show how to do that next. Since I’m using a Mac, gnuplot is installed easily with homebrew:
|
1 2 |
brew install gnuplot --with-x11 |
To make the plot, run the following code making sure you removed the FORMAT=CSV from the original simulation file and running it again to create the .prn file.
|
1 2 3 |
gnuplot plot '/path/to/data/memristor.cir.prn' using 3:4 with lines title "I-V" |
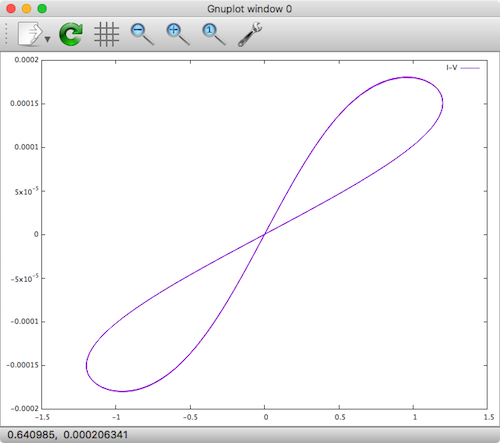
Xyce GNUPlot Memristor
Schematic Capture
For a decent tutorial on how to build a netlist automatically from a schematic capture tools and to plot the results using gnuplot see: Using Open Source Schematic Capture Tools With Xyce.
According to the Xyce Reference Guide page 484, Xyce has the Yakopcic and TEAM models integrated natively. The source code for these files is in .../workspaces/workspace_eda/Xyce-6.6/src/DeviceModelPKG/OpenModels/src/N_DEV_MemristorYakopcic.C and .../workspaces/workspace_eda/Xyce-6.6/src/DeviceModelPKG/OpenModels/src/N_DEV_MemristorTEAM.C
Custom Verilog-A Device models for Xyce
The rest of this blog covers the steps in integrating a simple test Verilog-A model, which comes with the Xyce source code, into a Xyce simulation. Xyce does not at this time have any capability for direct import of Verilog-A models through a netlist. Before a model written in Verilog-A can be used, it must be converted to C++ using Xyce/ADMS, compiled, and linked into Xyce. The plugin method requires that Xyce be built specially to support shared library loads — the standard binary distributions of Xyce do not support this feature yet. A script is provided with Xyce that simplifies the generation and installation of such plugins, and a command-line option is available to load the plugin at run time.
Because we previously used the compiler flags --enable-shared and --enable-xyce-shareable in order to integrate your own Verilog-A/ADMS models, we should have a utility in usr/local/bin called buildxyceplugin. What this utility will do is compile your Verilog-A model files and simulation circuits using these models into a system library file with a *.so extension in usr/local/lib. Then when you run Xyce, you just need to tell it about this library with the -plugin option and then use Xyce like normal. Let’s build the Verilog-A examples that came with Xyce to make sure everything is working before building our own models.
First, we copy the toys directory form the Xyce source code to a different place. This way we won’t accidentally change anything important in Xyce’s source tree and mess up a future compile. We can do whatever we want with it. In this case, I copied Xyce-6.6/utils/ADMS/examples/toys to ~/Desktop.
Navigate to the directory containing the Verilog source
|
1 2 |
cd ~/Desktop |
Build a plugin
|
1 2 |
buildxyceplugin -o toys *.va /usr/local/lib |
Test the plugin
|
1 2 |
Xyce -plugin /usr/local/lib/toys.so DiodeClipper.cir |
Plot the results
|
1 2 3 |
gnuplot plot '...path/to/DiodeClipper.cir.prn' using 2:3 with lines title "V(3)", '...path/to/DiodeClipper.cir.prn' using 2:4 with lines title "V(2)" |
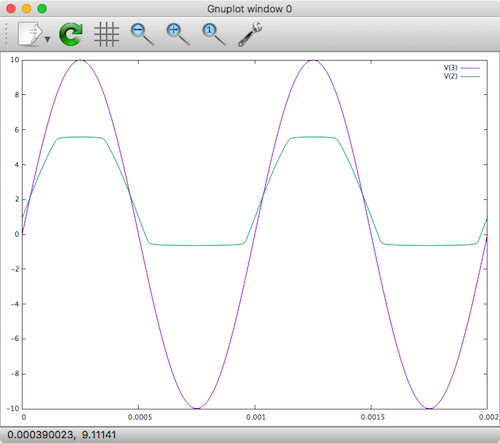
Xyce Verilog Diodeclipper
Xyce Links
- What is Xyce?
- Xyce Website: http://xyce.sandia.gov/
- Main Repository (requires registration): https://xyce.sandia.gov/downloads/sign-in.html
- Mirror Repository: https://xyce.sandia.gov/downloads/source_code.html
- 3rd Party Libraries: https://xyce.sandia.gov/downloads/3rd_party_libraries.html
- Forum: https://groups.google.com/forum/#!forum/xyce-users
- Source code documentation:
- Xyce User Guide
Verilog-A Links
- Verilog-A on Wikipedia
- Writing your first Verilog-A compact model
- Introduction to Verilog-A
- Verilog AMS Manual
Further Resources
- Knowm Memristors
- The Generalized Metastable Switch Memristor Model
- The Problem is Not HP’s Memristor–It’s How They Want To Use It
- The Joglekar Resistance Switch Memristor Model in LTSpice
- memristor-models-4-all Project on Github
- The Pershin Voltage Threshold Memristor Model in NGSpice
- Well-posed Memristor Modeling with Xyce and Verilog-A


Leave a Comment