Overview
The purpose of this post is to give you some guidance on how to create your own Memristor Discovery experiment. We show you how to make a ‘clone’ of an existing experiment and then modify it for your own purposes. You should be somewhat familiar with Java and Java Swing before doing any of this, otherwise you are going to make a mess. You should also take a look at our development environment and familiarize yourself with the various pieces of software.
Memristor Discovery Code Overview
Memristor Discovery is an open-source Java Maven project that is hosted on GitHub. The code has been architected to allow the addition of “experiments”. Each experiment is it’s own package within the parent directory:
|
1 |
org.knowm.memristor.discovery.gui.mvc.experiments |

Memristor Discovery Experiment Directory
Each experiment is controlled by the Control Panel on the left and the results displayed in some form in the Result Panel. The Header and Footer Panels are shared among experiments. Preference are set by interacting with the Preferences Panel.
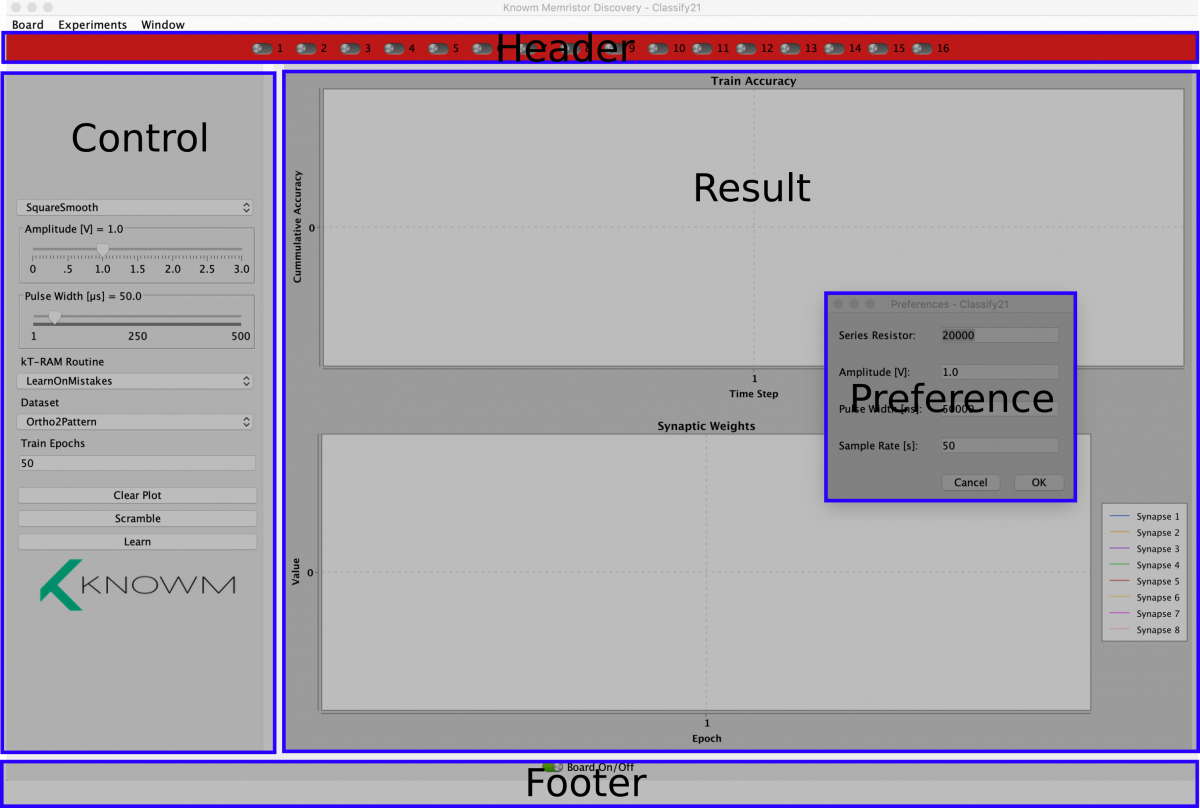
Memristor Discovery GUI Overview
The code conforms to the “Model View Controller” pattern, hence the naming terminology and code patterns.
To create a new experiment we will copy an existing experiment, rename it, and then ‘plug it in’ to the main application so it is available in the menu. We can then change things around to match our particular experiment. Building our “thermodynamic boolean constraint solver” aka kTBitSatSolver is pretty close to the “Classify12” experiment, and we want to develop for the newer V2 board and edge-board chips, so we will use the Classify12 experiment as our starting point.
Copy a Memristor Discovery experiment as starting point for a new experiment
Read the entirety of this section and understand what we are doing before starting this. It is a description of a procedure that will allow you to easily create new experiments by using existing experiments as a starting point.
Make a copy of the starting experiment folder and delete the original in the experiment directory. The absence of the experiment folder will cause your IDE (I use Eclipse) to throw errors where it is referenced. This occurs in the MemristorDiscovery.java class in three places. For each place there is an error, make a copy of the error-producing code and comment it out like this:
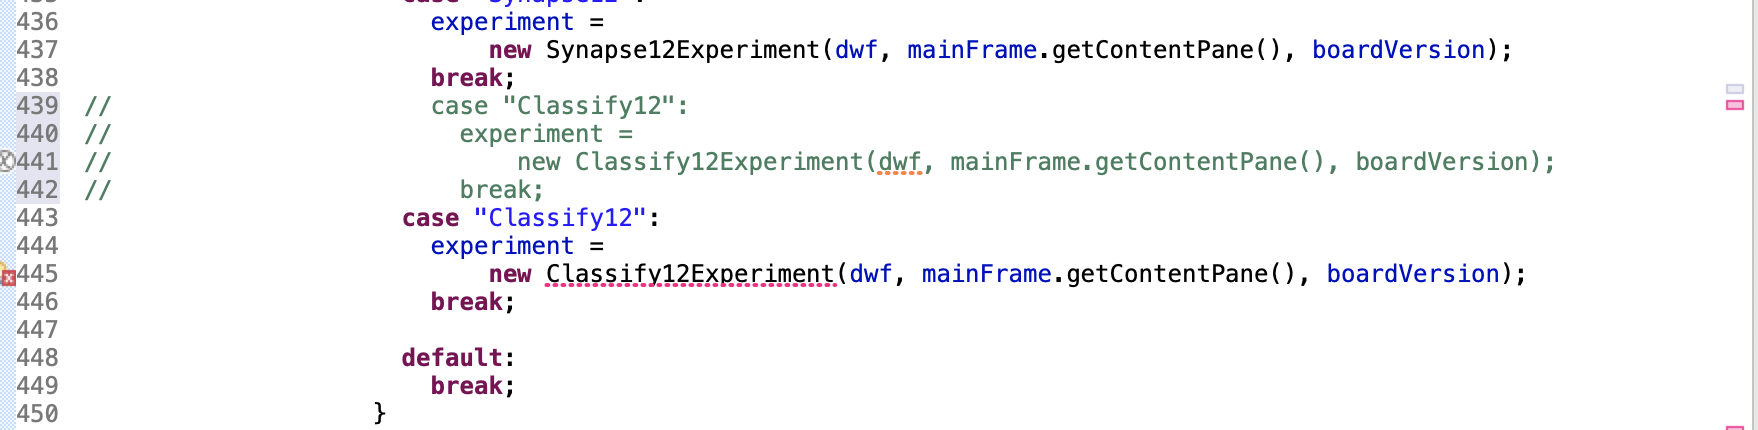
Comment out the code copy
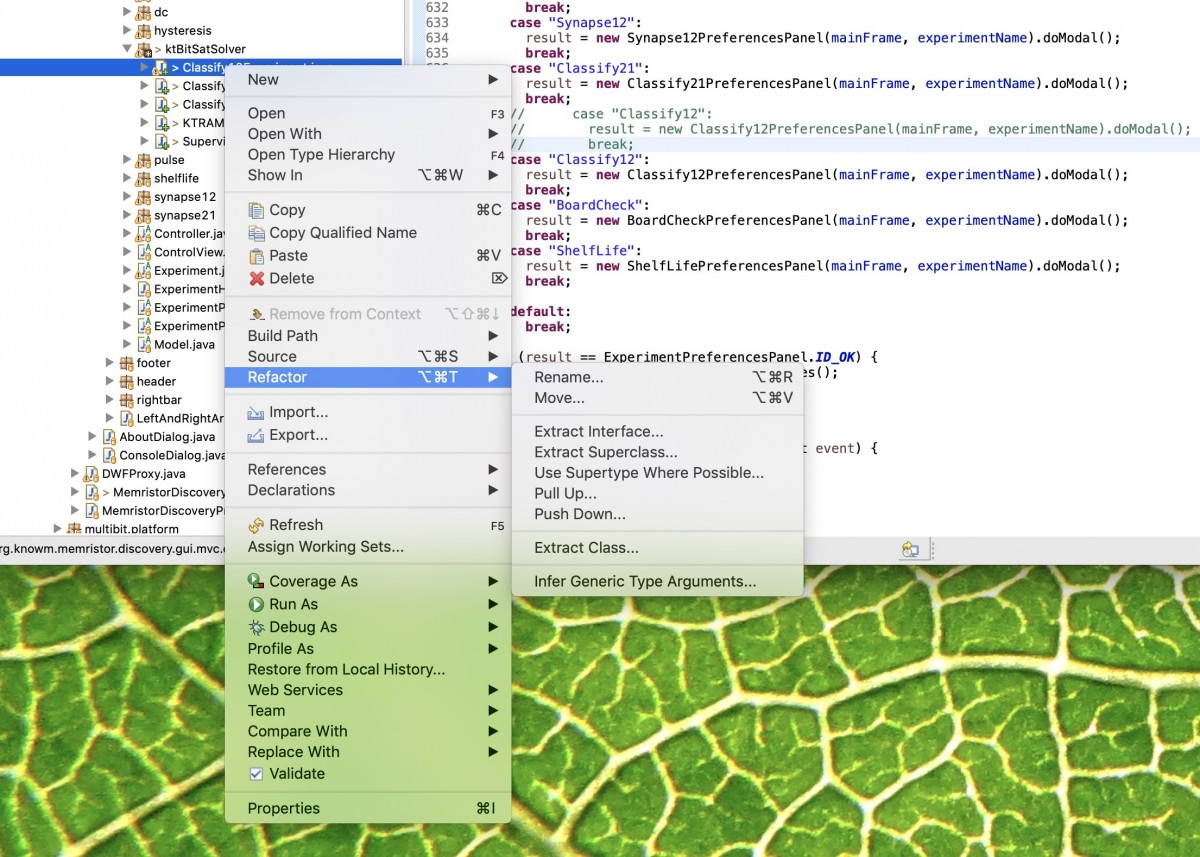
When all three locations are copied and commented, place a copy of experiment back into the experiment directory. The errors in your IDE will go away. If needed, refresh your IDE. We now use the IDE to refactor the name of the original experiment (Classify12) to our new experiment (ktSatSolver). Rename the package and any and all files inside the experiment folder. In our case we are calling our new experiment “kTBitSatSolver”. Don’t worry–the old experiment is safe as a copy and those lines we commented out early will be comment back in soon. The result is a new “shell” for an experiment based on the Classify12 experiment. If you are using eclipse, right click on the class, select ‘refactor’ and then ‘rename’:
Refactor Rename Java Class In Eclipse
With all the code renamed, go back to MemristorDiscovery.java and uncomment the code that referenced the original (copied) experiment. While you are doing this, fix any relevant text in the case statements that reference the copied experiment but which point to your new experiment. Now, move the original experiment back to the experiment directory and refresh your IDE.
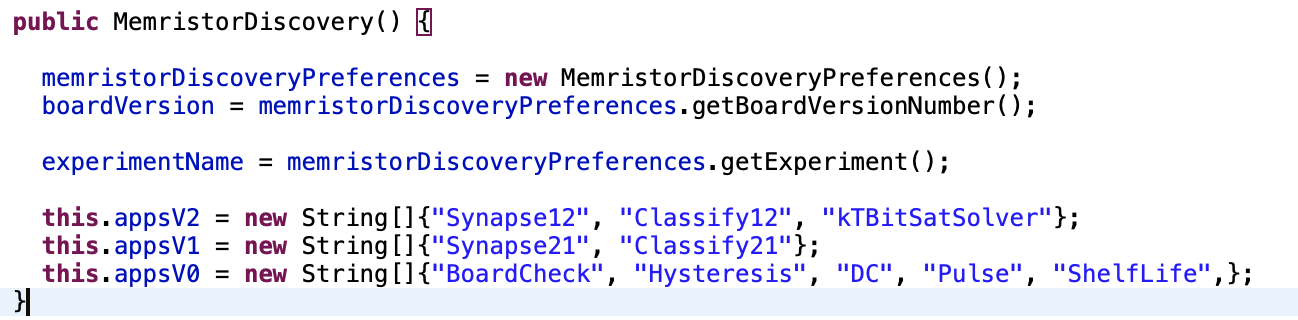
The last step in cloning an experiment is to fill in String arrays in the constructor. Since this experiment is built on the V2 board we add it to the V2 array:
Adding a Memristor Discovery Experiment
Modify the cloned experiment to fit your needs
There is no point in coding an experiment from scratch if most of it has already been coded! We cloned the Classify12 experiment because its layout and operation is close to our desired layout for a boolean constraint solver. The top plot in the result panel can be re-named and re-purposed to plot the total number of constraints satisfied over time, while the bottom plot can be left as-is to inform us about the state of each synapse. We will need to modify the control panel to accommodate our new experiment and replace the core experiment logic.
The control panel widgets are added to the control panel in ControlPanel.java. Other than being able to control the applied voltage pulse magnitude and width, we just need a file chooser and a start button. In our case we will want to load an external file that specifies the boolean constraint, delete the irrelevant widgets left over from our cloned experiment and modify the names as needed.
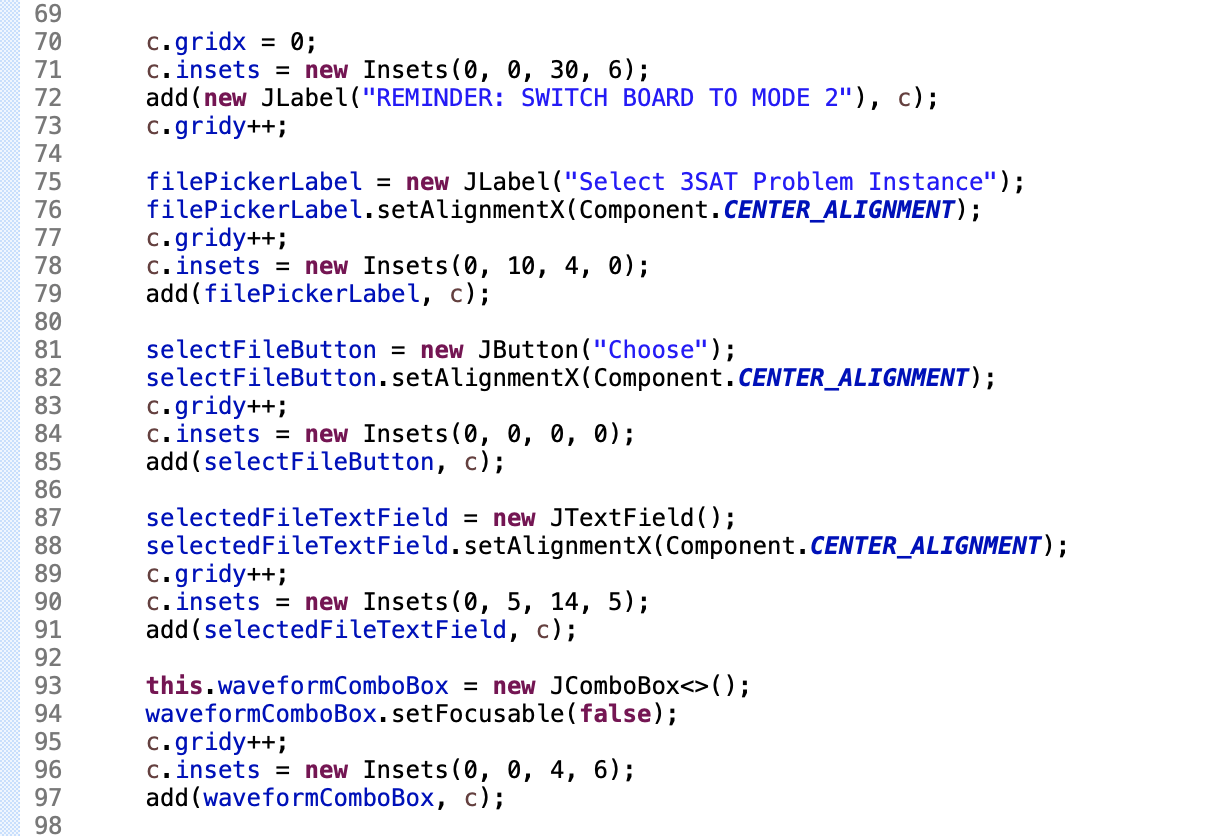
Add Java Swing components to control panel
Control Panel Action Listeners
Actions can be attached to control panel widgets in two places. The primary location is the ControlConroller.java class. This is where you should put any actions associate with experiment settings. The second place in within the Experiment class itself inside the addWorkersToButtonEvents() method. This is where the various experiment logic should be initiated when an ‘action button’ is pressed. In other words, use ControlController.java for setting up the experiment values and the addWorkersToButtonEvents() method for the experiment logic triggered by a ‘start’ button or equivalent.
We will be downloading 3SAT problem instances from toughsat.appspot.com and then loading them into our program using the file picker. Files downloaded default to download to the desktop in my browser, so I will set up our file-picker to default to the user desktop directory and allow this to be selected in the preferences.
Preferences
Preferences allow you to set default starting parameter values and then let the user change the values and save them to a file. The next time the application opens, these new user-specified values will be loaded. Preference key-value pairs are declared in an experiment preferences class in the main experiment directory. In our specific case this is kTBitSatSolverPreferences.java:
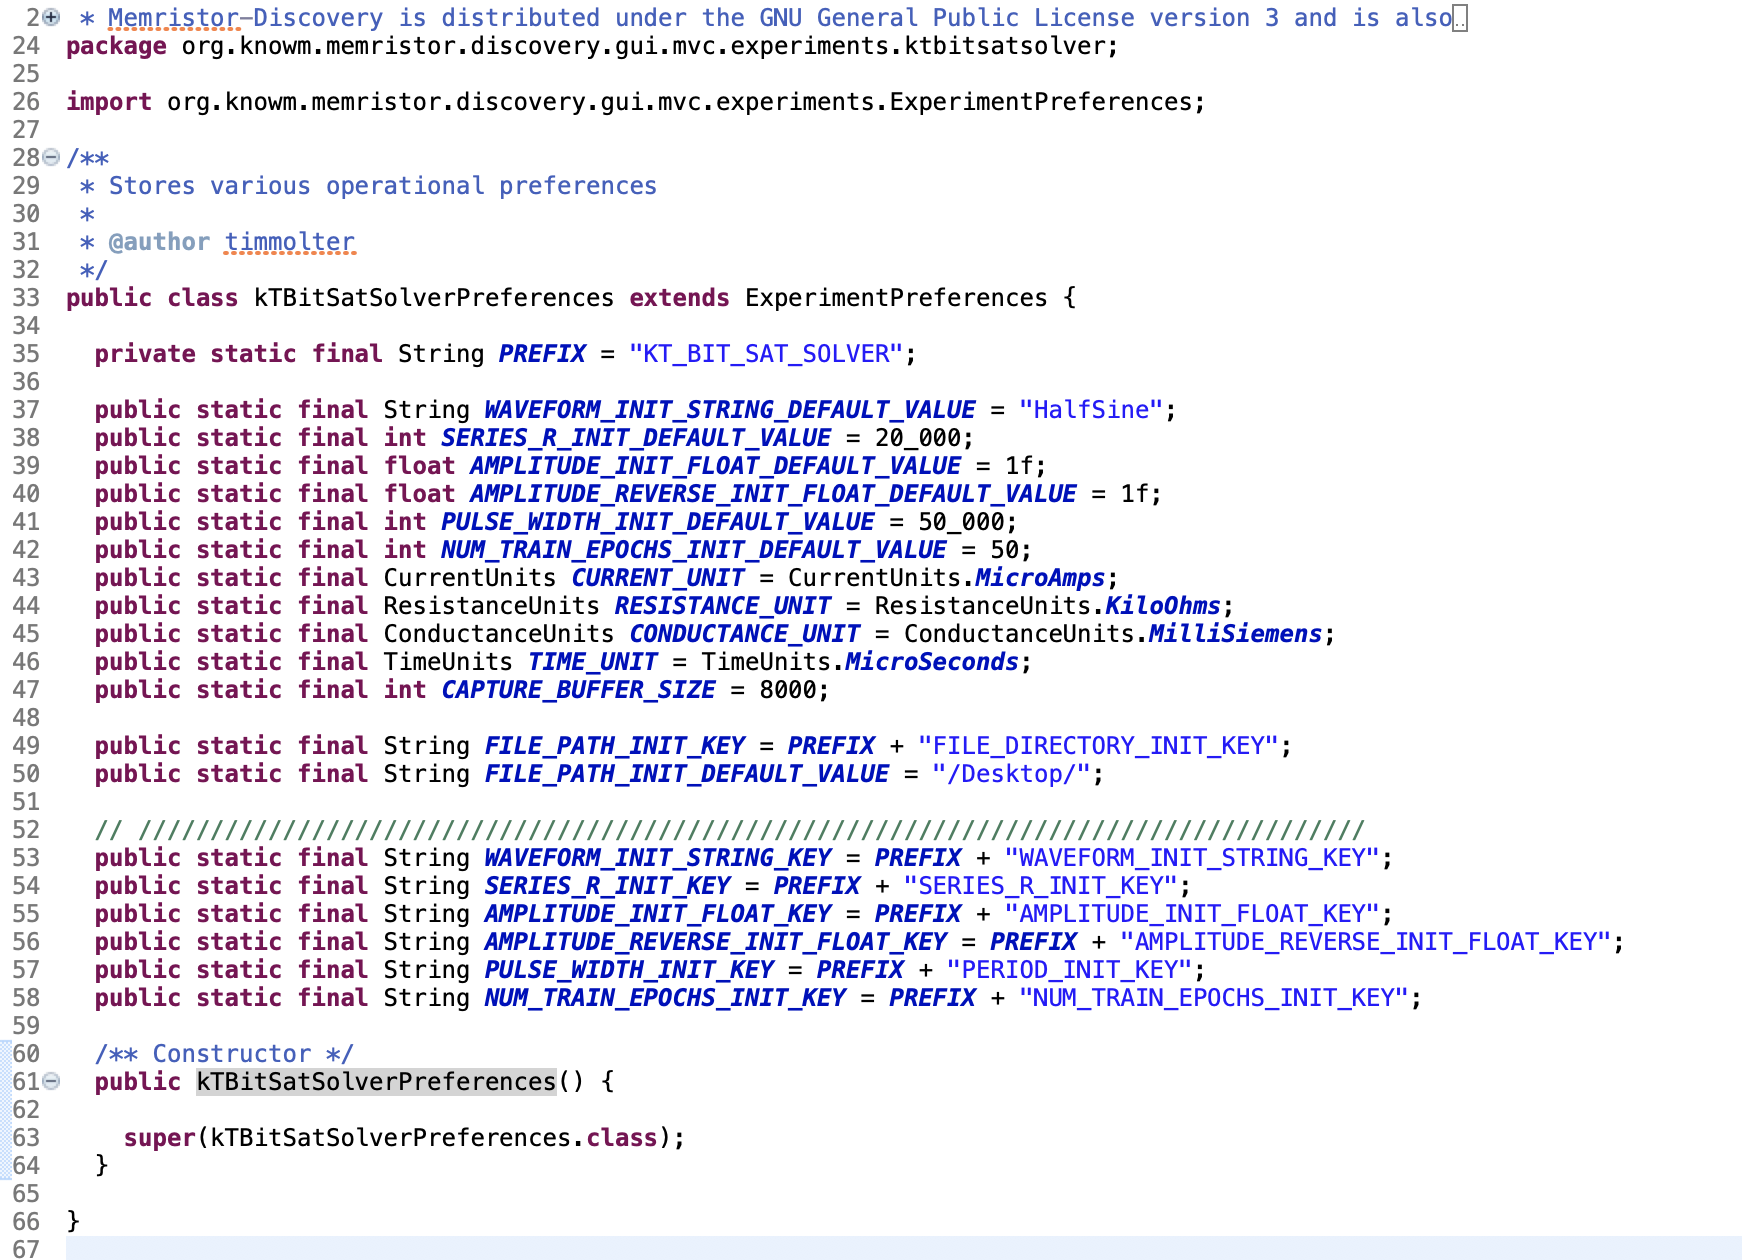
Memristor Discovery Preferences
GUI widgets for the preferences panel and associated action listeners are located in the experiment-specific preference panel class, in our case kTBitSatSolverPreferencesPane..java
To make sure a change in the preferences is loaded onto the control panel after it is closed, be sure to fill in the appropriate code in the initGUIComponentsFromModel() method of ControlController.java. In our case we want to update the chosen file:

ControlController.initGUIComponentsFromModel()
Experiment Logic
Each experiment needs to be spun off on its own thread when the user click the appropriate button. As mentioned above, the action listeners for these events are defined in the experiment class’s addWorkersToButtonEvents() method. Define a “worker” class that extends SwingWorker<Boolean, Double> and fill in its doInBackground() method with your specific experiment logic. In this specific case we are loading a text file from a specified directory that specifies 3SAT constraints and printing them to the screen:
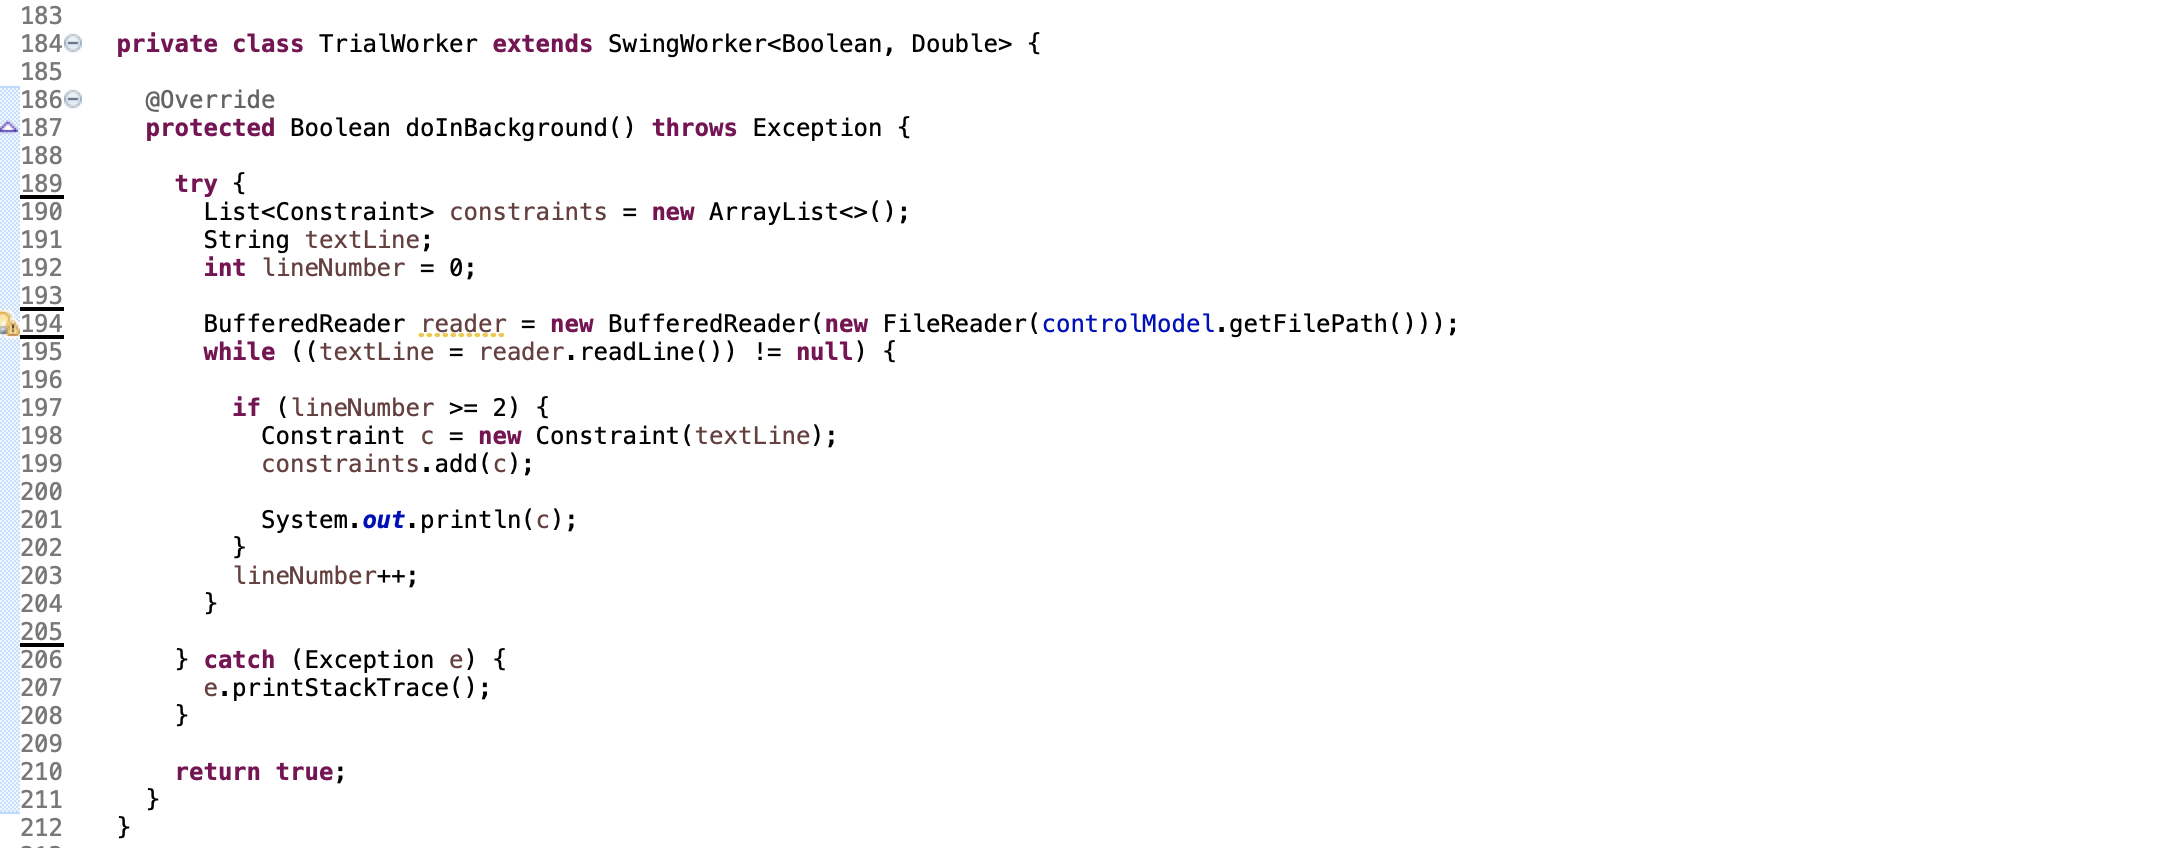
Worker Thread for Memristor Discovery Experiment
Of course, if you are looking to make a new Memristor Discovery experiment then you likely want to interact with the board, drive pulses, take measurements, etc. For examples of how to do this, just take a look at all the ‘worker’ classes located in the main experiment class. For example, to see how to drive pulses, look at the worker threads in PulseExperiment.java, etc.
Good Luck!


Leave a Comment