[popupwfancybox id=”6″]
In a previous post titled Simulating the Knowm M-MSS Memristor Model Using Qucs-S with Xyce, I presented the use of the open-source project Qucs-S – Quite Universal Circuit Simulator featuring the Spice4qucs branch and the Xyce Electronic Simulator as part of the Knowm Open-Source EDA Stack. Several extensions to Qucs-S are being added to fully support circuit designs using the Knowm M-MSS ( Mean Meta-Stable Switch Memristor Model ). In this post I will continue to explore the dynamic behavior of the M-MSS model by creating circuits that will simulate the model’s response to a square wave pulse with various pulse configurations while introducing some more advanced features of Qucs-S and Xyce integration.
An example Qucs-S project has been created to perform various experiments that we will later set up on actual memristor devices using the Knowm Memristor Discovery board and associated extender modules. The following experiments are included in the example Qucs-S project but only the knowm_mr_pulse experiment will be covered in this tutorial.
Memristor Experiments Included in This Tutorial
- knowm_mr_pulse – Rectangular Pulse with positive incremental pulse amplitude from 250mV to 1V with 250mV steps
- knowm_mr_pulse_neg – Rectangular Pulse with negative incremental pulse amplitude from -250mV to -1V with -250mV steps
- knowm_mr_pulse_bipolar – Series of positive pulses followed by a series of negative pulses with peak amplitude constant at 800mV and -650mV repectively
- knowm_mr_pulse_bipolar_incr – Multiple series of alternating bipolar pulses with incremental stepped amplitude from -100mV to -1V and 100mV to 1V
Each of these experiments was created with the inclusion of a series limiting resistor to effectively limit the current through the M-MSS memristor which is generally necessary in actual circuit designs in order to avoid overcurrent conditions that could damage the device. An accompanying no_load version of each of the circuits is also included in the KnowmMemristor_prj examples to allow for inspection of the ideal memristor behavior.
Prerequisites
Please follow the detailed tutorial Simulating the Knowm M-MSS Memristor Model Using Qucs-S with Xyce to learn the basics of creating a Qucs-S schematic file for use with Xyce to perform a transient simulation of the M-MSS model using an AC sinusoidal waveform.
Update to the latest release candidate #2 of the Knowm OSS EDA Stack. It is available for macOS 10.12 Sierra and Ubuntu 16.04 LTS (Xenial Xerus). This post covers installation and use on macOS and support for Xyce (Serial) simulations only. The included versions of Qucs-S (0.0.19S) and Xyce 6.6 include libraries for amd64 architectures. Support for other architectures and operating systems are under development and will be released when available.
Software Installation
NOTE: The current release candidate for the Knowm OSS EDA Stack is available for macOS Sierra 10.12 and Ubuntu 16.04 LTS (Xenial Xerus). This post covers installation on MacOS and Linux but usage only on the macOS platform. The installation process is different, but the use of the software is more or less the same. There is currently support for Xyce (Serial) simulations. The included versions of Qucs-S (0.0.19S) and Xyce 6.6 include libraries for amd64 (intel) 64-bit architectures. Support for other architectures and operating systems are under development and will be released when available.
First, download the pre-built bundles for the Qucs-S and Xyce for your operating system. These packages are available from the Knowm.org.
- MacOS Sierra 10.12 QUCs
- MacOS Sierra 10.12 Knowm Examples
- MacOS Sierra 10.12 Xyce
- Linux QUCs
- Linux Knowm Examples
- Linux Xyce
MacOS Sierra
To Uninstall a Previous Version of the OSS EDA Applications
- Go to the
/Applications/folder -
Drag the
qucsfolder and its contents to the trash. -
Drag the
xycefolder and its contents to the trash.NOTE: All user files and application settings are stored in the
.qucssub-directory of your$HOME/directory so all previous work will be preserved after installing the new version of the software.
Install Qucs-0.0.19S Release Candidate #2 Bundle
-
Double click on the bundle
qucs_knowm_oss_eda-0.0.19s-rc2.dmgto mount the bundle. -
Copy or drag-n-drop the
qucsfolder to/Applicationsfolder. -
Open the
qucsfolder that you just copied and open the./binfolder. -
Drag the
Qucs.appto the Launcher Bar. -
Right click on the Qucs-S bundle and select
Eject Qucs-Sfrom the context menu.
Install Xyce-6.6-Open_Source Release Candidate #2 Bundle
-
Double click on the bundle
xyce_knowm_oss_eda-6.6-rc2.dmgto mount the bundle. -
Copy or drag-n-drop the
xycefolder to/Applicationsfolder. -
Right click on the Xyce-6.6 bundle and select
Eject Xyce-6.6from the context menu.
Install Qucs-S Example Projects bundle
-
Double click on the bundle
qucs_knowm_oss_eda-examples.dmgto mount the bundle. -
Copy or drag-n-drop the
KnowmMemristor_prjfolder to your user$HOME/.qucsfolder. By default this should be/Users/username/.qucson MacOS or/home/usernameon Linux OS. -
Open the
.qucsfolder that you just copied the bundles contents to. You should have two project folders, theYmemristor_prjfrom the previously completed tutorials and the newKnowmMemristor_prjjust installed in the previous steps. These project folders contain the files necessary to follow along with future tutorials and will provide examples of how to extend the concepts presented here to build projects for your own circuit designs.
Linux
NOTE: The release candidate Debian packages are currently being installed in the /usr/local under their own package directories to allow for side-by-side comparison of release candidates. The final release versions will be provided under a package manager and will use standard directories in /usr.
To Uninstall a Previous Version of the OSS EDA Applications
- Start a Terminal application session and type
dpkg -l | grep qucs. -
Type
sudo dpkg -r qucs-knowm-oss-edaor substitute the app name returned from the previous step. -
Start a Terminal application session and type
dpkg -l | grep xyce. -
Type
sudo dpkg -r xyce-knowm-oss-edaor substitute the app name returned from the previous step.NOTE: All user files and application settings are stored in the
.qucssub-directory of your$HOME/directory so all previous work will be preserved after installing the new version of the software.
Install Qucs-0.0.19S .deb package
-
Download the package
qucs-knowm-oss-eda-0.0.19s-rc2.debto the $HOME/Downloads directory. -
Install using the following command $
sudo dpkg -i qucs-knowm-oss-eda-0.0.19s-rc2.deb -
From Terminal set the PATH variable $
export PATH=/usr/local/qucs/bin:$PATH -
Test the install by typing
qucs --version. -
Execution should return
Qucs 0.0.19 (7526999).
Install Xyce-6.6-Open_Source bundle
-
Download the package
xyce-knowm-oss-eda-6.6-rc2.debto the $HOME/Downloads directory. -
Install using dpkg the following command $
sudo dpkg -i xyce-knowm-oss-eda-6.6-rc2.deb -
Set the LD_LIBRARY_PATH variable
export LD_LIBRARY_PATH=/usr/local/xyce-6.6/serial/lib -
Set the PATH variable
export PATH=/usr/local/xyce-6.6/serial/bin:$PATH -
Test the install by typing
runxyce -v.
Install Octave 4.0.3 – Scientific Programming Language bundle for MacOS Sierra
NOTE: A Knowm provided Octave bundle is not currently provided with this release so you will need to install Octave 4.0.3 from the Sourceforge.
- Download the
Octave 4.0.3version from the sourceforge.net site here. Click onOctave MacOSX Binarythen select2016-7-11-binary-octave-403. Selectoctave_gui_403_appleblas.dmgto start the download. -
Double click on the
octave_gui_403_appleblas.dmgto mount the bundle and launch the installer. -
Follow the package install instructions – for MacOs Sierra the installer will use
/Applications/Octave.app/as the default application directory. You don’t need to install Octave on Ubuntu/Debian as it is included in the/usr/local/qucs/octavefolder to allow for easy updates or uninstallation of Octave in the future. -
You need to create or edit the
.octavercfile in your$HOME/directory in your favorite text editor to setQtas the graphics package to use with Octave. Enter the following single line:graphics_toolkit(“qt”)
-
Save
.octaverc
Launch Qucs-S
-
Click on the Qucs app icon on the Launcher Bar.
NOTE: the first time Qucs is started is will inform you that no default simulator has been selected.
-
Click
Okand then selectXyce (serial)as the default if prompted.
Qucs-S Application Settings
The Qucs Settings file qucs.conf is stored in your $HOME directory in the .config directory. If you experience any issues with persistence of your settings in this section you can manually edit this file with a compatible editor.
- Select
File/Application Settings...from the menu. -
Click the
Locationstab.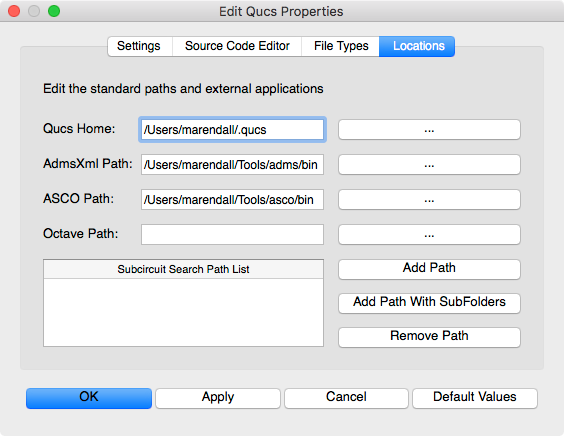
Application Settings
NOTE: The
Qucs Homewill be a folder named.qucsin your user$HOME/directory. This is where all projects will be stored for your installation. Each project will be stored in a separate sub-directory with the_prjsuffix appended to the name you specify. Other directories such as thespice4qucsdirectory will also be created which will store the data and netlist information for your Xyce simulations.
ADMS – An Automatic Device Model Synthesizer
ADMS is a code generator that converts electrical compact device models specified in high-level description language into ready-to-compile C code for the API of SPICE simulators. Based on transformations specified in XML language, ADMS transforms Verilog-AMS code into other target languages.
- Verify
AdmsXml Path:is to/Applications/qucs/adms/bin. If not set it.
ASCO – A SPICE Circuit Optimizer
ASCO project aims to bring circuit optimization capabilities to existing SPICE simulators using a high-performance parallel differential evolution (DE) optimization algorithm. Currently out-of-the-box support for Eldo (TM), HSPICE (R), LTspice (TM),Spectre (R), Qucs and ngspice exist.
- Verify
ASCO Path:to/Applications/qucs/asco/bin. If not set it.
GNU Octave – Scientific Programming Language
Powerful mathematics-oriented syntax with built-in plotting and visualization tools. The Octave syntax is largely compatible with Matlab. The Octave interpreter can be run in GUI mode,as a console, or invoked as part of a shell script. It is accessed in Qucs by selecting View/Octave Window from the main menu.
- Set Octave Path: to
/Applications/Octave.app/Contents/Resource/usr/bin. If not, set it.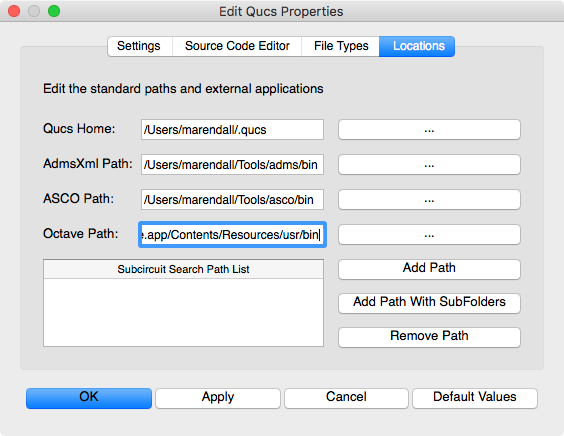
Application Locations
-
Click
Applyto save the settings. -
Click
OKto exit the settings dialog.
Open the KnowmMemristor_prj Examples Project File
-
Select the
Projectstab on the left of the Main Dock. -
Double click the
KnowmMemristor_prjto automatically open theContenttab.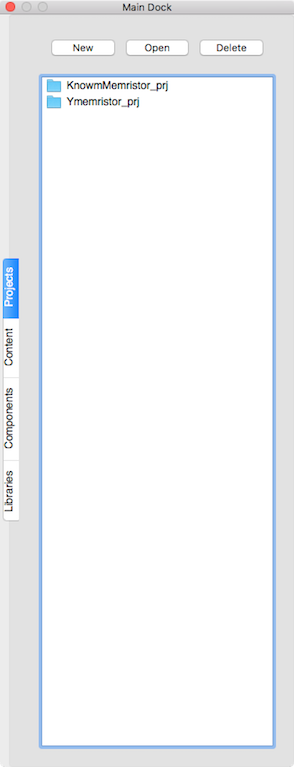
Project List
Select the Schematic diagram
-
Double click on the
knowm_mr_pulse.schfrom theSchematicslist in the Main Dock.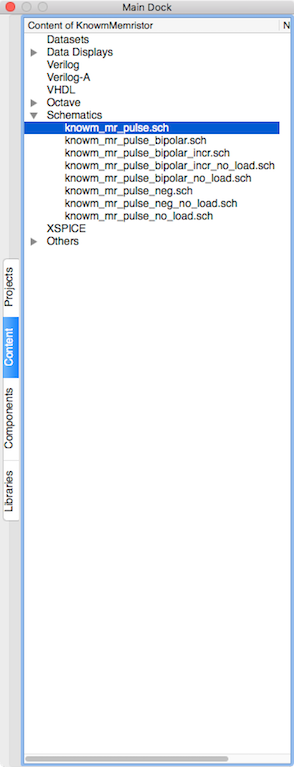
KnowmMemristor_prj Content
Pulse Schematic
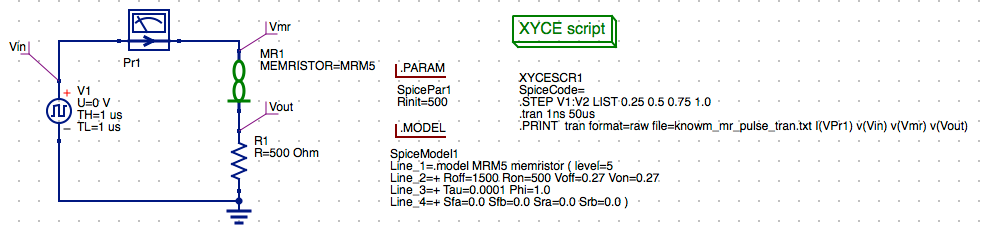
NOTE: We will be referring to the multiple components of this schematic in the following sections to familarize you with the basic settings required to perform the transient simulation using Xyce. You may want to consult the Qucs-S documentation and Xyce Reference Manual for more information on other available settings.
-
Notice the
MR Memristorhas been placed on the schematic and the MRM5 model has been assigned to the MR1 component instance.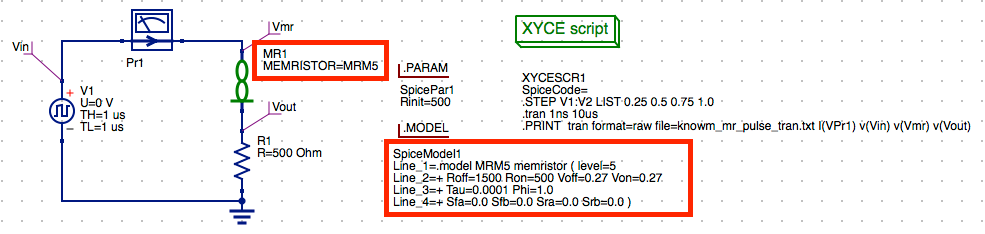
Knowm Memristor Technology Model MRM5
-
The .Model directive for the MRM5 model has been selected from a newly added
Knowm Memristor Technologylibrary found under theLibrariestab of the Main Dock.NOTE: This library will be the repository in Qucs-S for any new models developed and provided by Knowm.org and the Knowm Developer Community. The models and updates will also be featured on the
memristor-models-4-allGithub repository.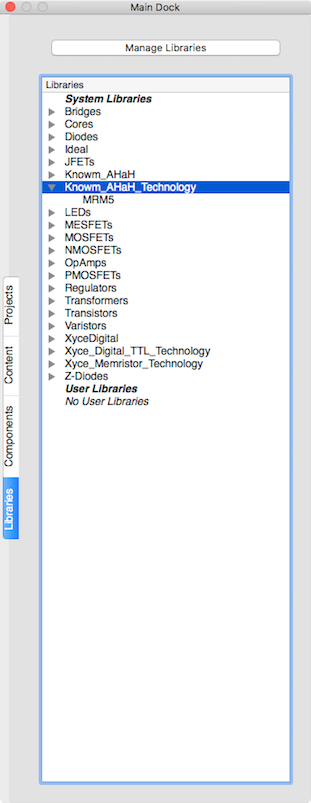
Knowm Memristor Technology Library
-
The Rectangle Voltage source has been selected from the
sourcesdrop-down list and the parameters set for a 1us Pulse Width and 2us Period.(TH + TL = Period)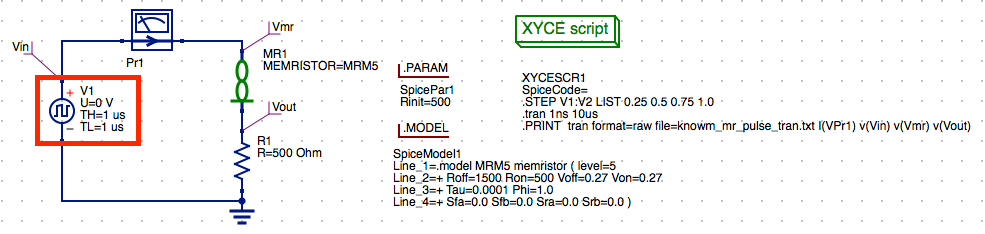
Xyce Script Square-wave Pulse Setting
NOTE: The voltage is set to
0 Vbut we will be specifying the pulse applitude from the Xyce script component which will be covered in the following steps. -
The
XYCE scriptcomponent is available from thesimulationsdrop-down list under theComponentstab of the Main Dock. This component allows for addtional Xyce netlist statements to be specified that will be integrated into the Qucs-S Xyce compatible netlist. We will cover a few of these functions in the next couple of steps.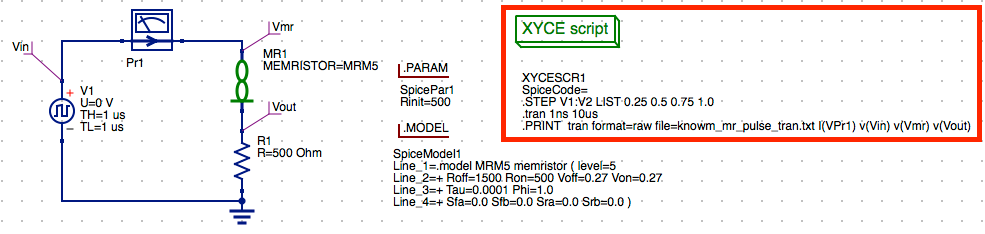
Xyce Script Square-wave Pulse Setting
-
Notice the
.STEPfunction. This function will instruct Xyce to perform multiple simulation runs modifying theV1pulse amplitude by theparameter :V2according to the voltages listed. Other allowable syntax includeLIN, OCT, DECwithinitial, final, stepfor the selected parameter. We are using theLISTfeature to specify a discrete list of pulse amplitudes. (see the .STEP statement in theXyce 6.6 Reference Guidefor detailed information).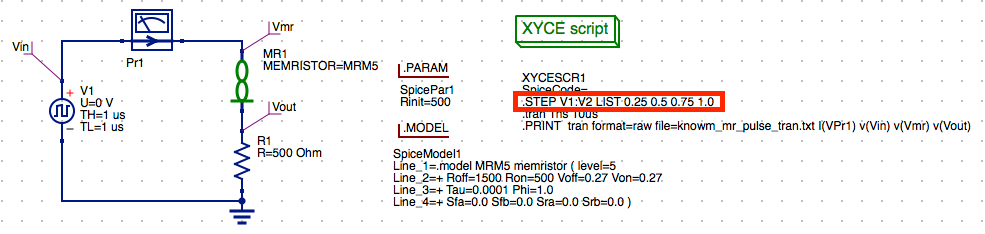
Xyce Script Square-wave Pulse Amplitude List
-
Next the familiar .TRAN statement from SPICE is specified in the XYCE script component. This replaces the .TRAN component available from the
simulationsdrop-down list found in theComponentstab of the Main Dock. Xyce will use this.transtatement to perform the transient analysis.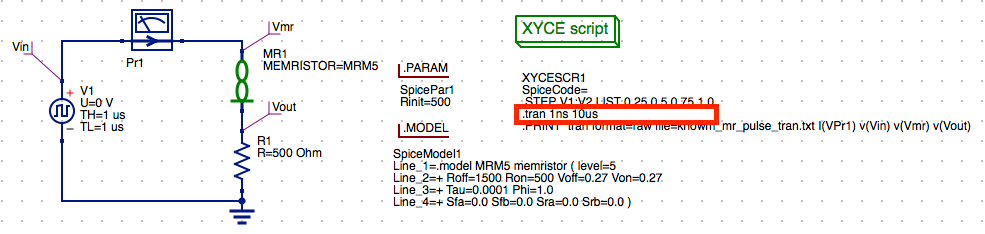
Xyce Script Tranisent Simulation Setting
-
The
.PRINTstatement of theXYCE scriptprovides the format, filename and data vectors from the simulation results to allow post-analysis and plotting. In order to use view diagrams of tabular and cartesian plots in Qucs-S you should specifyrawformat. The data names should match thenamenodes specified in the schematic (i.e.I(Pr1), v(Vin), v(Vmr), v(Vout)) as listed in the example.
Xyce Script .PRINT Statement
Save the Schematic Diagram File
-
The filename
knowm_mr_pulse.schhas been used for this example schematic and will be used in future tutorials. -
Click the
Savebutton on the toolbar to save the schematic file.
Save Toolbar Button
Run a Simulation
-
Press
F2or selectSimulatebutton on the toolbar.
Run Simulation Toolbar Button
-
Check simulation for
errorsorwarnings. See the status bar at the bottom of the Qucs windowlower right corner.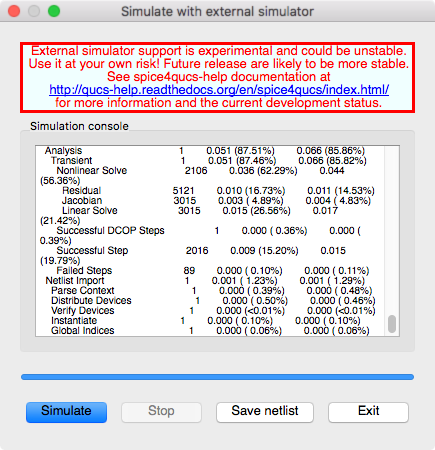
External Simulation Window
-
Click the
Exitbutton to close theSimulationwindow. -
You can view and messages written by the Xyce simulator by clicking the
F5key or selectingShow Last Messagesfrom the Simulations menu.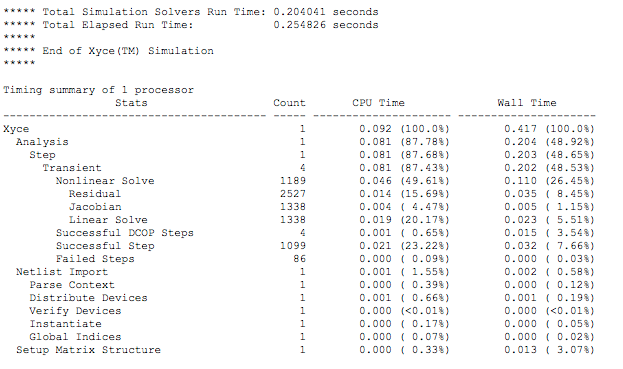
Xyce Simulator Message
-
You can save the current netlist by clicking the
Save Netlistbutton on the simulation window.NOTE: The
F6key orShow Last Netlistfrom the Simulations menu currently only displays the last netlist for the lastest
Qucsator simulation. If you save the netlist using the button on the simulation window then you can open the.cirfile underOtherslist in the project tree.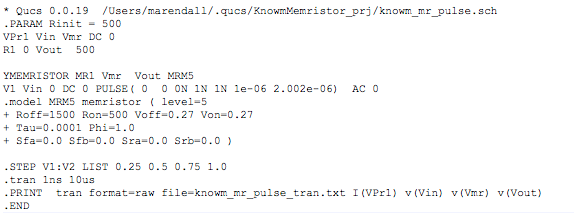
Qucs Generated Netlist
-
The raw data file
knowm_mr_pulse_tran.dat.xyceproduced by the transient simulation will be automatically created in the$HOME/.qucs/KnowmMemristor_prj/directory.
Set Keyboard Preferences (Optional)
-
Open
System Preferencesand selectKeyboard. -
Then check thebox
F1,F2,
etcas standard function keys.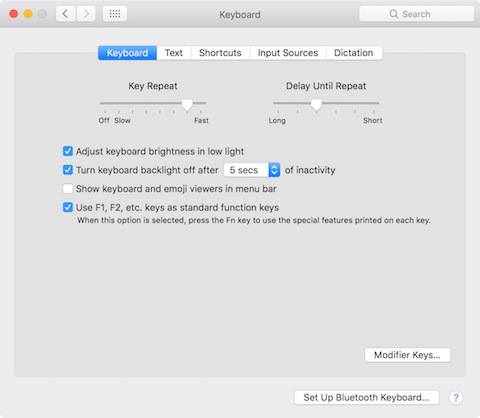
Change Keyboard Preferences for F1, F2 Selection
NOTE: You can change the keyboard mapping for other the keys in macOS by selecting the Shortcuts tab then define the new key mappings in the Keyboard group.
View the Tabular Results
- Check the
Tabularresults.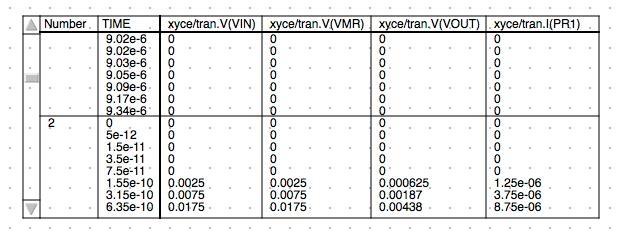
Tabular Results
-
Notice that
Numberis the label of the first column. If you scroll down the list you should observe 4 datatsets corresponding to the stepped amplitude values that we specified in the.STEPstatement of theXYCE script. The table now holds the results of the 4 transient simulations that were performed.NOTE: When using the XYCE Script only data specified in the
.PRINTstatement will be available in Qucs-S diagrams.
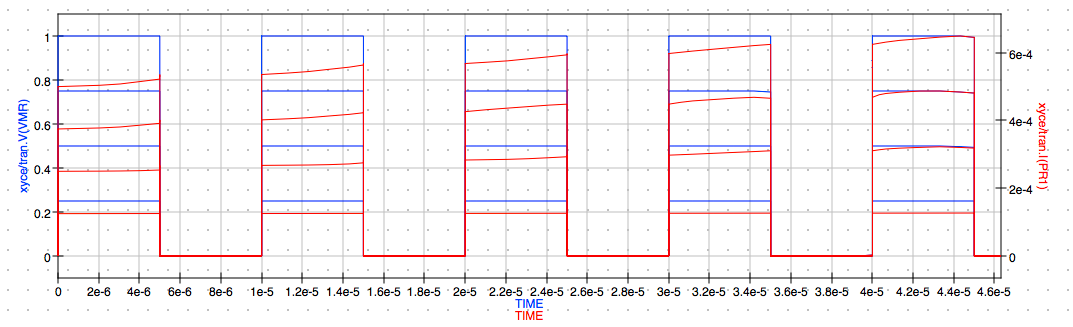
Cartesian Plot of Memristor I,V vs. Time Results
-
You should also observe the results in the specified Cartesian plot defined in the schematic.
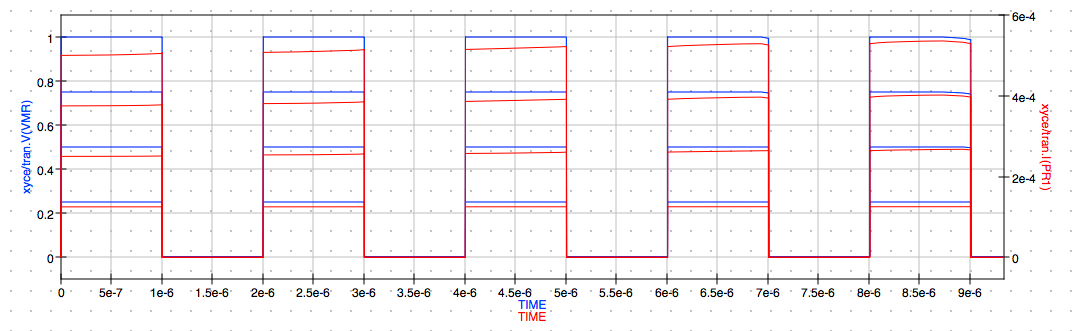
I-V vs. Time Cartesian Plot
NOTE: The results contain multiple pulses of the varying amplitudes we defined in the .STEP function of the XYCE script.
250mV, 500mV, 750mV and 1V.
Modifying the Experiment
Set Rectangle Pulse Voltage Source properties
-
Double click on the
Rectanglar Voltagesymbol to open the parameters for the source.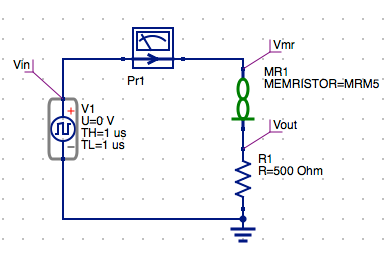
Select Rectangular Pulse Source Settings
-
Leave the
O Vamplitude for theUparameter unchanged for the pulse as we will again be using the settings in the.STEPstatement of theXYCE scriptto specify the pulse amplitudes for our transient simulation runs.
Rectangular Pulse Settings
-
Select the
THrow in the properties table. -
Change the
duration of high pulsesfrom1 usto5 us. -
Select the
display in schematiccheckbox.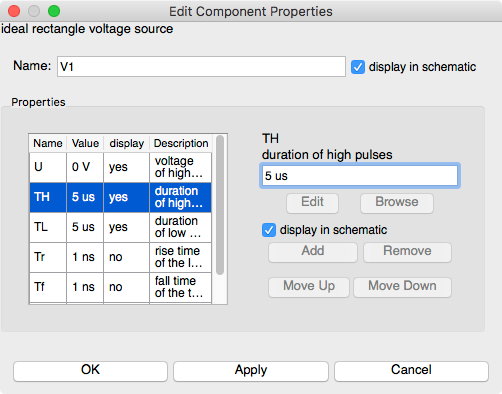
Duration for High Pulse
-
Select the
TLrow in the properties table. -
Change the
duration of low pulsesfrom1 usto5 us.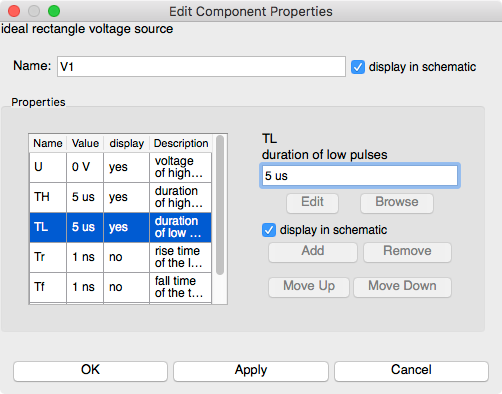
Duration of Low Pulse
-
Select the
Trrow in the properties table. -
Verify the
rise time of the leading edgeis set to1 ns.Duration of Low Pulse
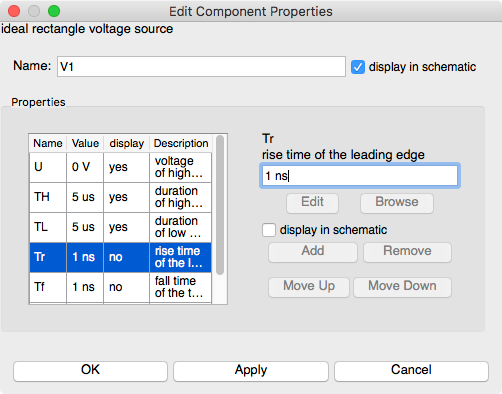
Rise Time of Pulse Leading Edge
- Select the
Tfrow in the properties table. -
Verify the
fall time of trailing edgeis set to1 ns.
Fall Time of Pulse Trailing Edge
-
Click
Applyto set the frequency value. -
Click
OKto exit the properties dialog.
Reconfigure the Transient Simulation in the XYCE Script
-
Double click on the
XYCE scriptcomponent symbol in the schematic to open the settings.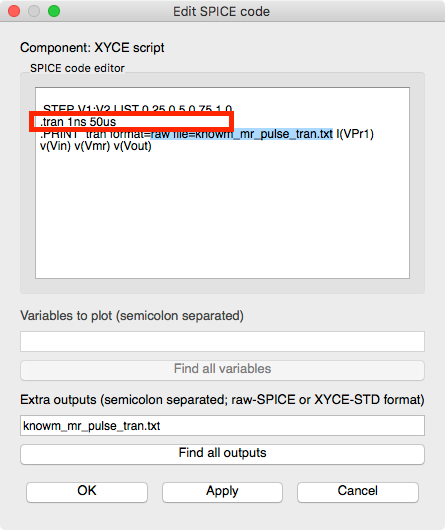
Specify Xyce Script Transient Simulation Parmeters
-
Change the
.transtart and end time to1uand50usrepectively. -
Click
Applyto save the changes. -
Click
OKto exit the properties dialog.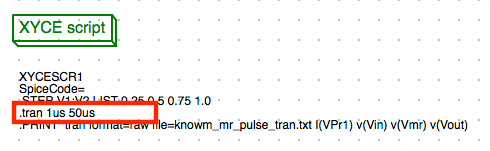
Schematic with Updated Xyce Script
Save the Schematic Diagram File
- Click the
Savebutton on the toolbar to save changes to theknowm_mr_pulse.schschematic file.Save Toolbar Button
Run a Simulation
-
Press
F2or selectSimulatebutton on the toolbar.Run Simulation Toolbar Button
-
Check simulation for
errorsorwarnings. See the status bar at the bottom of the Qucs windowlower right corner.External Simulation Window
-
Click the
Exitbutton to close theSimulationwindow.
View the Tabular Results
-
Observe the
Tabularresults.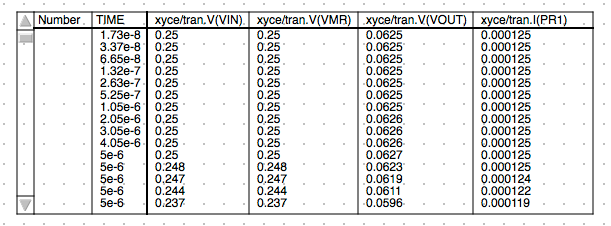
Tabular Results for 5us Pulse
-
Notice again that
Numberis the label of the first column. If you scroll down the list you should observe 4 datatsets corresponding to the stepped amplitude values that we specified in the.STEPstatement of theXYCE script. The table now holds the results of the latest 4 transisent simulations that were performed.NOTE: When using the XYCE script only data specified in the
.PRINTstatement will be available in Qucs-S diagrams. -
You should also observe the results in the specified Cartesian plot defined in the schematic.
I-V vs. Time Cartesian Plot for 5 us Pulse
NOTE: The results contain multiple pulses of the varing amplitudes we defined in the .STEP function of the XYCE script.
250mV, 500mV, 750mV and 1V.
Conclusion
That completes this tutorial. Try some of the other example schematic files available in the KnowmMemristor_prj project. All of these experiments use common features presented here. In our next tutorial we will explore adding Qctave scripts to perform post-analysis on the transient simulation results.
You should also checkout the documentation and other examples listed in the Qucs 0.0.19 and Qucs-S 0.0.19 documentation available on the web at the following URLs.
- Qucs 0.0.19 Help: https://qucs-help.readthedocs.io/en/0.0.19/subcircuit.html
- Qucs-S 0.0.19 Help: https://qucs-help.readthedocs.io/en/spice4qucs/SPICEComp.html
- Qucs-S Bugtracker:https://github.com/ra3xdh/qucs/issues
- Qucs-S Sub-project Home Webpage: https://ra3xdh.github.io/
Other References
- What is Qucs?
- What can all be installed from Sourceforge?
- Qucs Website: http://qucs.sourceforge.net/
- Main Repository: https://sourceforge,net/p/qucs/git/ci/master/tree/
- Mirror Repository: https://github.com/Qucs/qucs
- Mailing lists: http://sourceforge.net/p/qucs/mailman/
- Forum: http://sourceforge.net/p/qucs/discussion/
- Bug trackers:
- Source code documentation:
- Wiki: https://github.com/Qucs/qucs/wiki
Further Resources
- Knowm Memristors
- The Generalized Metastable Switch Memristor Model
- Simulating the Knowm M-MSS Memristor Model Using Qucs-S with Xyce
- The Problem is Not HP’s Memristor–It’s How They Want To Use It
- The Joglekar Resistance Switch Memristor Model in LTSpice
- Build Xyce from Source for ADMS Verilog-A Model Integration
- The Pershin Voltage Threshold Memristor Model in NGSpice
- memristor-models-4-all Project on Github


Leave a Comment