![]() Running Apache Storm cluster on EC2 is greatly simplified with the open source project storm-deploy-alternative. With this handy project, you can define your Storm cluster in a simple configuration file and create the running instances as well as installing and running all necessary software components such as Zookeeper, Storm, and Nimbus is all handled for you. Beneath the hood, the jClouds library is used. This is a 100% Java based solution. We have also previously published another how-to article called How to Install a Distributed Apache Storm Cluster on running Apache Storm on your own hardware. Please check out that article for more background information on the mechanics of a Storm cluster. Deploying to EC2 is more or less the same, but on someone else’s hardware.
Running Apache Storm cluster on EC2 is greatly simplified with the open source project storm-deploy-alternative. With this handy project, you can define your Storm cluster in a simple configuration file and create the running instances as well as installing and running all necessary software components such as Zookeeper, Storm, and Nimbus is all handled for you. Beneath the hood, the jClouds library is used. This is a 100% Java based solution. We have also previously published another how-to article called How to Install a Distributed Apache Storm Cluster on running Apache Storm on your own hardware. Please check out that article for more background information on the mechanics of a Storm cluster. Deploying to EC2 is more or less the same, but on someone else’s hardware.
This guide aims to help you get up and running with Apache Storm on Amazon EC2 as fast as possible. This example will target the AWS free trial-period t2.micro machines.
Set Up Individual Users
This step is optional. You could use your root account, but it is highly recommended to set up individual users.
Log in to your main Amazon AWS account. In the upper right hand corner, select Your Name ==> Security Credentials and select “Get Started with IAM users. You could also get to this IAM dashboard via clicking on Services in the upper left section of the upper menu and clicking IAM. On the left hand side menu of the IAM dashboard, select Groups and create a new group. Add an AmazonEC2FullAccess policy to it and add users to it. For each new user, note the Access Key Id and Secret Access Key.
Setup a password for each user and download the credentials file. The file contains the user’s password and access URL. Set up multi-factor authentication (MFA) if you’d like as well.
From this point forward, we log out of the main account and log back in as one of the user’s created above.
Set up SSH Key Pair
Create a SSH key pair on your local dev machine, giving them the names ec2 and ec2.pub, with no passphrase (when asked, just hit enter).
|
1 2 |
ssh-keygen -t rsa -f ~/.ssh/ec2 |
This key pair will be automatically used to establish an ssh connection with the launched EC2 instances. You can leave off the -f ~/.ssh/ec2 part of the above command if you want, and a key pair with the default name, id_rsa will be generated. If you already have a id_rsa key pair though, you’ll want to create a new one with a unique identity, ec2 in this example.
Review So Far
So far, we have set up the basic essentials for deploying an Apache Storm cluster to Amazon EC2 with the storm-deploy-alternative project. It involved creating a group and user(s) for this action, logging in as one of the users and creating a new empty-passphrase ssh key pair on your dev machine.
Next, we deploy a Storm cluster using the user’s Access Key Id, Secret Access Key and ec2 ssh keys.
Using storm-deploy-alternative
There are at least two ways to use storm-deploy-alternative, one of which, involving building a jar with Maven, is already described in the README file of the project. Here, I will describe how to run it from within the Eclipse IDE. You may want to do this method if you want to look at and alter the source code or even perhaps to contribute back to the project by submitting a pull request. Both options require cloning the source code from github and hence requires that Git is installed on your dev machine.
|
1 2 3 |
cd ~/path/to/somewhere git clone https://github.com/timmolter/storm-deploy-alternative |
Both methods also require that you define which Amazon Machine Image (AMI) you will be creating running instances of. Note that you do not need to create your own AMIs under your account. Instead you need to pick one from the Ubuntu Cloud Images. A handy website for finding the appropriate AMI from Ubuntu is here: https://cloud-images.ubuntu.com/locator/ec2/. At the bottom of the page you can filter the choices based on Zone, Version, Arch, etc. After you found the AMI you need, take note of the AMI-ID.
Config Files
You’re going to need both a credential.yaml and a configuration.yaml file. They are more or less self explanatory and you’ll need to copy-pasta the SSH key pair name, if not the default, the Access Key Id and Secret Access Key info. There are template configuration files in the storm-deploy-alternative project in the conf directory.
Cluster config
|
1 2 3 4 5 6 7 8 9 10 11 12 13 14 15 16 |
# # Amazon EC2 example cluster configuration # mycluster: - image "us-west-2/ami-c94856a8" # Ubuntu 14.04 LTS AMI - region "us-west-2" # Region - remote-exec-preconfig {} - remote-exec-postconfig {} - ssh-key-name "ec2" # Optional. defaults to "id_rsa" - storm-deploy-alternative-cloud-jar-url "https://s3-us-west-2.amazonaws.com/your-bucket/storm-deploy-alternative-cloud.jar" - storm-tar-gz-url "http://mirror.yannic-bonenberger.com/apache/storm/apache-storm-0.9.3/apache-storm-0.9.3.tar.gz" - zk-tar-gz-url "http://apache.lauf-forum.at/zookeeper/zookeeper-3.4.7/zookeeper-3.4.7.tar.gz" - memory-monitor "false" - t2.micro {ZK, WORKER, MASTER, UI, LOGVIEWER} # Request service - t2.micro {WORKER} # Request service - t2.micro {WORKER} # Request service |
Ensure the image resides in the same region as specified. Choose a mirror download URL for storm and zookeeper or put the files in your own S3 bucket and use those URLs.
Credentials
|
1 2 3 4 5 |
## ## Amazon AWS Credentials ## ec2-identity: "GDYTFC59KU6JKHJG" ec2-credential: "YIO7jgjhg987qKgRfFJuke958mmGwrPsgsd" |
Run storm-deploy-alternative in Eclipse
This requires the m2e Eclipse plugin to be installed first.
Import the project into Eclipse: File ==> Import ==> Maven ==> Existing Maven Projects … After the project is imported into Eclipse, the first thing to do is create two files in storm-deploy-alternative-local/conf called storm-deploy-alternative-local/conf/credential.yaml and storm-deploy-alternative-local/conf/configuration.yaml. You can just copy and paste the provided storm-deploy-alternative-local/conf/credential_example.yaml and storm-deploy-alternative-local/conf/configuration_example.yaml files to get started. Update the information as needed and as described above.
Optionally, you might want to change the logging level, although the default is pretty good. To do that, find and open up the simplelogger.properties file and set your preferred logging level.
Build and Upload Cloud Component
The cloud component of this project, storm-deploy-alternative-cloud.jar, is downloaded by each cluster instance and is mainly used to run Storm and zookeeper under supervision. You need to upload storm-deploy-alternative-cloud/target/storm-deploy-alternative-cloud.jar to some location on the web accessible by your cluster instances via wget. You own S3 bucket would be a logical location. Update the configuration.yaml entry, storm-deploy-alternative-cloud-jar-url, accordingly. To build it in Eclipse right-click on the parent project ==> Run As ==> Maven install. Better would be to run mvn clean package, because it doesn’t actually need to be installed in your local Maven repo. You can accomplish that by choosing Maven build… instead.
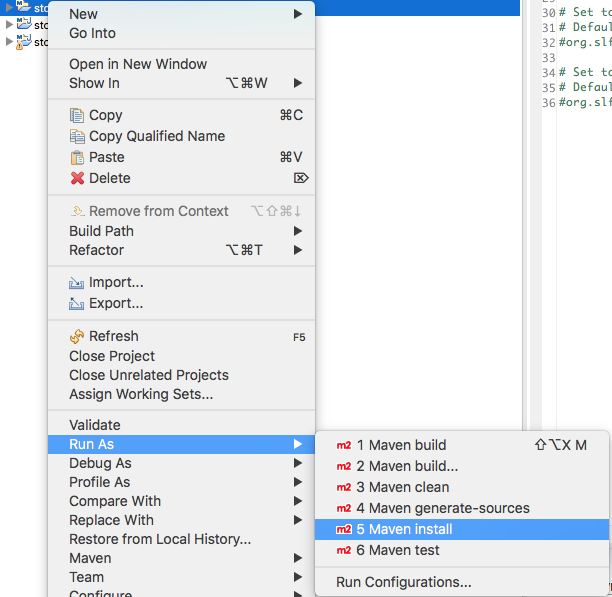
Maven Eclipse Build Cloud
Next, find the class StormDeployAlternative, Right-Click ==> Run As ==> Java Application. The first time it will complain of missing program args. Open up the Run Configurations (Right-Click ==> Run As ==> Run Configurations) and add the program arg: deploy mycluster. Then run the program again.
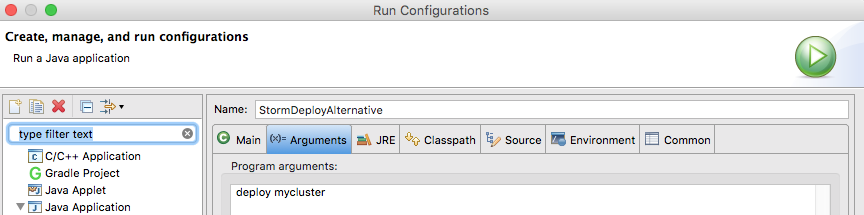
Eclipse Program Args
This time, if every things works out OK, the Storm cluster will be deployed. Expect to wait about 5 to 10 minutes before it’s fully deployed. After deployment, you will see the relevant cluster information including the StormUI and Ganglia web application URLs.
|
1 2 3 4 5 6 7 |
2015-12-22 14:18:28 [INFO] User: ubuntu 2015-12-22 14:18:28 [INFO] Started: 2015-12-22 14:18:28 [INFO] 52.24.208.48 [ZK, WORKER, MASTER, UI] 2015-12-22 14:18:28 [INFO] 52.35.69.62 [WORKER] 2015-12-22 14:18:28 [INFO] Storm UI: http://52.24.208.48:8080 2015-12-22 14:18:28 [INFO] Ganglia UI: http://52.24.208.48/ganglia |
You can and should verify that the instances have been deployed by looking at your EC2 console.

ec2 Instances
SSH Into the MASTER Node
Just to test that you can SSH into the MASTER node, run the following command, replacing ec2 with whatever your SSH key name is that you used above.
|
1 2 |
ssh -i ~/.ssh/ec2 ubuntu@52.24.208.48 |
Run a Test Topology
SSH’ed into the MASTER node of the cluster, run the following command, which launches a test storm topology that comes bundled with Storm.
|
1 2 |
storm jar "/home/ubuntu/storm/examples/storm-starter/storm-starter-topologies-0.9.3.jar" storm.starter.WordCountTopology wordcount |
The result will look something like this:
|
1 2 3 4 5 6 7 8 9 10 |
Running: java -client -Dstorm.options= -Dstorm.home=/home/ubuntu/storm -Dstorm.log.dir=/home/ubuntu/storm/logs -Djava.library.path=/usr/local/lib:/opt/local/lib:/usr/lib -Dstorm.conf.file= -cp /home/ubuntu/storm/lib/tools.cli-0.2.4.jar:/home/ubuntu/storm/lib/objenesis-1.2.jar:/home/ubuntu/storm/lib/ring-jetty-adapter-0.3.11.jar:/home/ubuntu/storm/lib/hiccup-0.3.6.jar:/home/ubuntu/storm/lib/math.numeric-tower-0.0.1.jar:/home/ubuntu/storm/lib/clj-stacktrace-0.2.2.jar:/home/ubuntu/storm/lib/chill-java-0.3.5.jar:/home/ubuntu/storm/lib/commons-lang-2.5.jar:/home/ubuntu/storm/lib/compojure-1.1.3.jar:/home/ubuntu/storm/lib/kryo-2.21.jar:/home/ubuntu/storm/lib/tools.logging-0.2.3.jar:/home/ubuntu/storm/lib/jetty-6.1.26.jar:/home/ubuntu/storm/lib/commons-fileupload-1.2.1.jar:/home/ubuntu/storm/lib/logback-classic-1.0.13.jar:/home/ubuntu/storm/lib/clojure-1.5.1.jar:/home/ubuntu/storm/lib/ring-core-1.1.5.jar:/home/ubuntu/storm/lib/commons-codec-1.6.jar:/home/ubuntu/storm/lib/jetty-util-6.1.26.jar:/home/ubuntu/storm/lib/core.incubator-0.1.0.jar:/home/ubuntu/storm/lib/reflectasm-1.07-shaded.jar:/home/ubuntu/storm/lib/minlog-1.2.jar:/home/ubuntu/storm/lib/slf4j-api-1.7.5.jar:/home/ubuntu/storm/lib/joda-time-2.0.jar:/home/ubuntu/storm/lib/clj-time-0.4.1.jar:/home/ubuntu/storm/lib/commons-exec-1.1.jar:/home/ubuntu/storm/lib/log4j-over-slf4j-1.6.6.jar:/home/ubuntu/storm/lib/ring-devel-0.3.11.jar:/home/ubuntu/storm/lib/disruptor-2.10.1.jar:/home/ubuntu/storm/lib/tools.macro-0.1.0.jar:/home/ubuntu/storm/lib/snakeyaml-1.11.jar:/home/ubuntu/storm/lib/ring-servlet-0.3.11.jar:/home/ubuntu/storm/lib/json-simple-1.1.jar:/home/ubuntu/storm/lib/jgrapht-core-0.9.0.jar:/home/ubuntu/storm/lib/commons-io-2.4.jar:/home/ubuntu/storm/lib/commons-logging-1.1.3.jar:/home/ubuntu/storm/lib/jline-2.11.jar:/home/ubuntu/storm/lib/servlet-api-2.5.jar:/home/ubuntu/storm/lib/storm-core-0.9.3.jar:/home/ubuntu/storm/lib/asm-4.0.jar:/home/ubuntu/storm/lib/clout-1.0.1.jar:/home/ubuntu/storm/lib/carbonite-1.4.0.jar:/home/ubuntu/storm/lib/logback-core-1.0.13.jar:/home/ubuntu/storm/examples/storm-starter/storm-starter-topologies-0.9.3.jar:/home/ubuntu/storm/conf:/home/ubuntu/storm/bin -Dstorm.jar=/home/ubuntu/storm/examples/storm-starter/storm-starter-topologies-0.9.3.jar storm.starter.WordCountTopology wordcount 719 [main] INFO backtype.storm.StormSubmitter - Jar not uploaded to master yet. Submitting jar... 729 [main] INFO backtype.storm.StormSubmitter - Uploading topology jar /home/ubuntu/storm/examples/storm-starter/storm-starter-topologies-0.9.3.jar to assigned location: storm-local/nimbus/inbox/stormjar-421c5495-0d0b-442c-bbb7-039e2fea6213.jar Start uploading file '/home/ubuntu/storm/examples/storm-starter/storm-starter-topologies-0.9.3.jar' to 'storm-local/nimbus/inbox/stormjar-421c5495-0d0b-442c-bbb7-039e2fea6213.jar' (3248859 bytes) [==================================================] 3248859 / 3248859 File '/home/ubuntu/storm/examples/storm-starter/storm-starter-topologies-0.9.3.jar' uploaded to 'storm-local/nimbus/inbox/stormjar-421c5495-0d0b-442c-bbb7-039e2fea6213.jar' (3248859 bytes) 807 [main] INFO backtype.storm.StormSubmitter - Successfully uploaded topology jar to assigned location: storm-local/nimbus/inbox/stormjar-421c5495-0d0b-442c-bbb7-039e2fea6213.jar 807 [main] INFO backtype.storm.StormSubmitter - Submitting topology wordcount in distributed mode with conf {"topology.workers":3,"topology.debug":true} 1281 [main] INFO backtype.storm.StormSubmitter - Finished submitting topology: wordcount |
Furthermore, you can check out the StormUI at the URL given above after the cluster deploy.
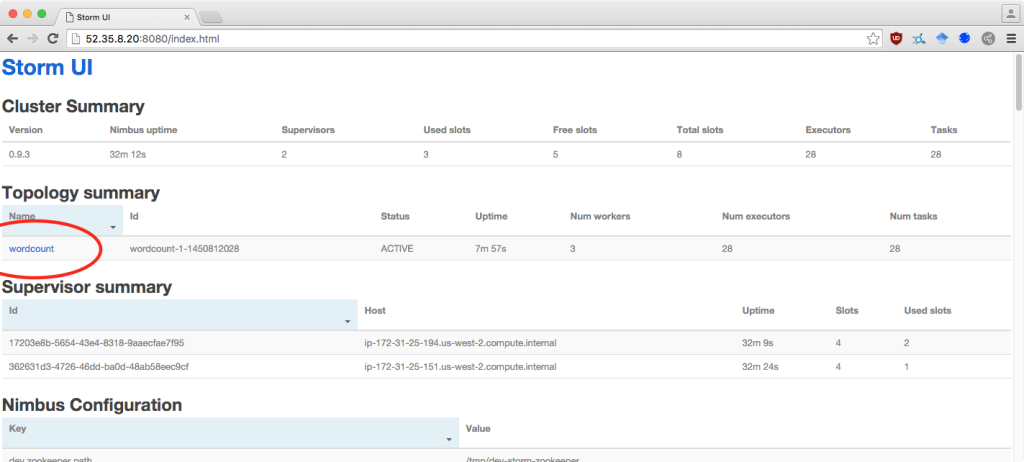
Storm UI ec2
And also ganglia.

Ganglia
Kill the Running Cluster
To terminate all ec2 cluster instances, you run the StormDeployAlternative class again, but with different program args: kill mycluster. After waiting a minute or two, you can check the EC2 dashboard and verify that the running instances were terminated.


4 Comments
Pradeep Sreekumar
Running the class dk.kaspergsm.stormdeploy.StormDeployAlternative shows its connecting to us east region even though i have used us-west-2 as the region in configuration.yaml
494 [main] DEBUG org.jclouds.http.internal.JavaUrlHttpCommandExecutorService – Sending request 1187894235: POST https://ec2.us-east-1.amazonaws.com/ HTTP/1.1
Tim Molter
I’ve seen similar messages like that before too, but never figured out why it’s connecting to different regions. If you figure out how to prevent that from happening, let me know!
baannee
I have an issue when want to add keygen to configuratio.yaml. Simply, it won’t work with existing key, which we are using for all other existing EC2 instances created in the past. Only work with fresh generated key. Did someone have the same issue and is there workarond?
Tim Molter
I recall that it had to work that way, but I don’t remember the reason at them moment.