Port Bonding
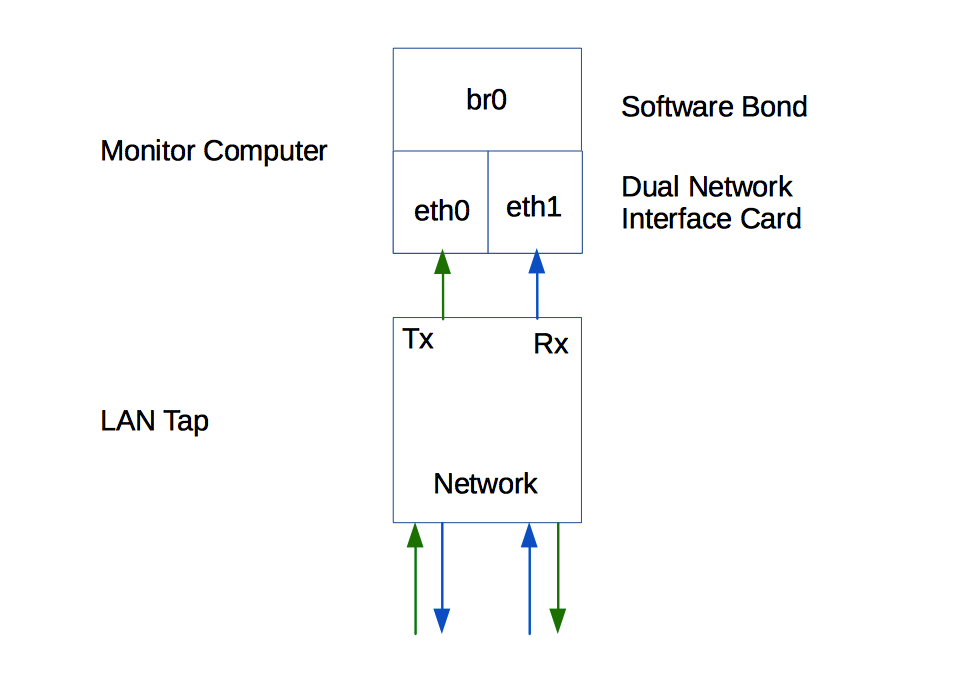
When using a passive or active LAN tap and not an “aggregator” or “mirror port” for monitoring network traffic, both the ‘incoming’ and ‘outgoing’ channels need to be bonded together for IDS systems such as Bro to process as a single network flow channel. This setup involves using a technique called bonding to take two physical interfaces and bond them together, creating a logical interface that we can use for Snort as an example. These instructions assume you are using Linux and more specifically some Debian distribution such as Ubuntu.
Network Interfaces
A network monitor machine has a minimum of two network interfaces which will be bonded into a single logical interface by software. Many times, a third NIC interface will be present on a monitor machine, which can be used for remote access (management port). Normally, we will use an integrated NIC port as the management port and a 3rd-party NIC with dual ports as the monitoring ports. The monitoring ports are connected to the LAN Tap and the packet flow is rejoined internally via port bonding (software-based).
Determine Assigned Network Interfaces to Physical Ports
First, you need to figure out which interface corresponds to the physical NIC ports.
|
1 2 |
ifconfig -a |
You should see that the 2 interfaces on the dual NIC share similar MAC addresses.
For an additional way to make the determination, install bmon and view live network data flow.
|
1 2 3 |
sudo apt-get install bmon bmon |
You should see data flowing to the one connected to the Internet (the management port) and NOT the tap interfaces (monitoring ports).
Note which interfaces should be assigned to the management and monitoring ports. For example: em0, p1p1 and p1p2 respectively.
Create Bonded Interface
Now we manually setup the bonded interface.
|
1 2 3 4 |
sudo apt-get install bridge-utils sudo brctl addbr br0 sudo brctl addif br0 p1p1 p1p2 |
Troubleshooting Bridge
|
1 2 3 |
sudo brctl delbr br0 brctl show |
We now have our bond, but it’s not persistent yet. For that we need to manually update ‘/etc/network/interfaces’:
|
1 2 |
sudo nano /etc/network/interfaces |
Add (adjusting network interface names accordingly):
|
1 2 3 4 5 6 7 8 9 10 11 12 13 14 15 16 17 18 19 20 21 |
auto p1p1 iface p1p1 inet manual up ip link set $IFACE promisc on arp off up down ip link set $IFACE promisc off down post-up ethtool -G $IFACE rx ; for i in rx tx sg tso ufo gso gro lro; do ethtool -K $IFACE $i off; done post-up echo 1 > /proc/sys/net/ipv6/conf/$IFACE/disable_ipv6 auto p1p2 iface p1p2 inet manual up ip link set $IFACE promisc on arp off up down ip link set $IFACE promisc off down post-up ethtool -G $IFACE rx ; for i in rx tx sg tso ufo gso gro lro; do ethtool -K $IFACE $i off; done post-up echo 1 > /proc/sys/net/ipv6/conf/$IFACE/disable_ipv6 auto br0 iface br0 inet manual bridge_ports p1p1 p1p2 up ip link set br0 promisc on arp off up down ip link set br0 promisc off down post-up ethtool -G br0 rx ; for i in rx tx sg tso ufo gso gro lro; do ethtool -K br0 $i off; done post-up echo 1 > /proc/sys/net/ipv6/conf/br0/disable_ipv6 |
Now restart the computer and see if the new br0 interface is persisted:
|
1 2 |
sudo shutdown -r now |
Test LAN Tap and Bond
We can now already test very roughly is the LAN tap and interface bonding is working.
Verify br0 interface persisted:
|
1 2 |
ifconfig -a |
Using the physical LAN Tap, connect it to the monitoring computer. Use bmon to view packets. You should observe data flowing on br0 which is the combination of the two monitor interfaces.
|
1 2 |
bmon |
Related Resources
Integrating Bro with the ELK Stack: http://knowm.org/integrate-bro-ids-with-elk-stack/
Installing Bro on Ubuntu: http://knowm.org/how-to-install-bro-network-security-monitor-on-ubuntu/




Leave a Comment