Introduction
The Knowm Development Team needs access to affordable research and development platforms for distributed computing. To address this need, we have paired Adapteva’s powerful and affordable Parallella boards with Apache Storm to create an ARM-based Ubuntu cluster. We hope you find the below information useful in building your own clusters.
Apache Storm
Apache Storm is an open-source high-performance, distributed real-time computation framework for processing large streams of data for applications such as realtime analytics, online machine learning, continuous computation, distributed RPC and other big data jobs. In this How-To article, I show the steps I took to install Apache Storm on a four-node computer cluster consisting of one Zookeeper node, a Nimbus node and two supervisor nodes. In my particular case each host was a Adapteva Parallella running Linaro, a Linux distribution based on Ubuntu for ARM SoC boards. These instructions should work fine for any hardware running Linux Ubuntu or Debian-based Linux distros, with slight modifications to match particular needs and configurations. For restarting failed Zookeeper and Storm components, I wrapped them in Upstart services that respawn automatically when a failure occurs. The official Storm docs instruct to “Launch daemons under supervision using “storm” script and a supervisor of your choice”, and the most common way of doing that seems to be using supervisord. I found that using Upstart was much simpler to set up and use though mostly because I used it before and am comfortable with it. If this guide was useful to you or you have any questions or suggestions, I’d love to heard your comments down below!
Cluster Topology 1
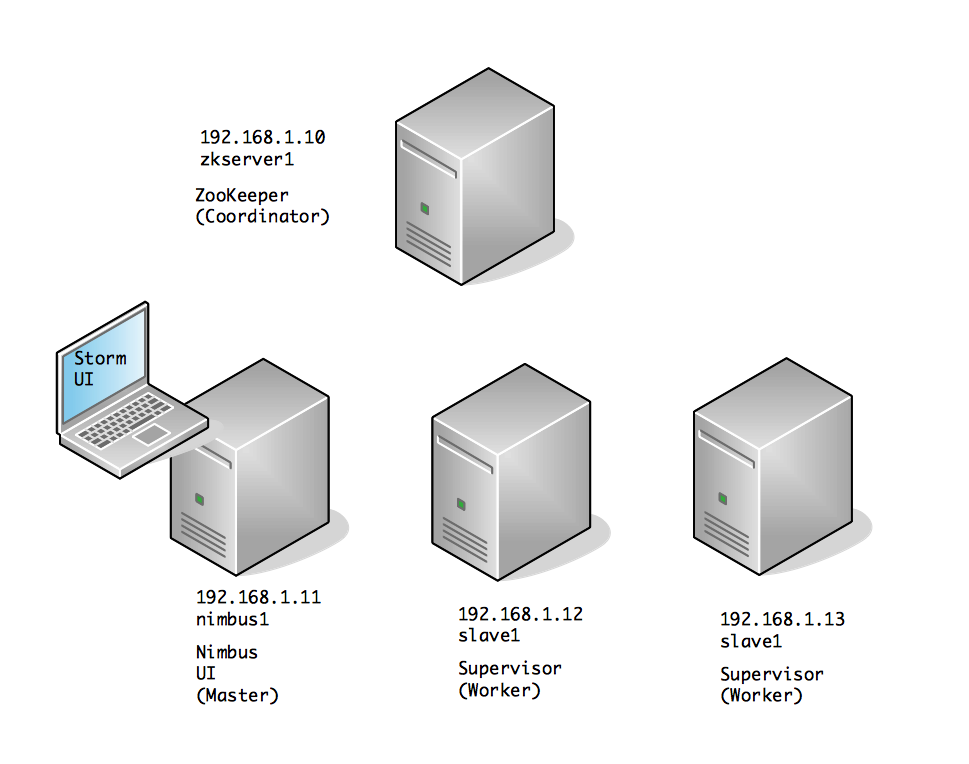
In general, to run a clustered Apache Storm topology, you need a zookeeper node, a nimbus node and N worker nodes. It is possible to combine multiple components on a single node as well, and for that see further below: Cluster Topology 2.
Decide what setup you want and create a hosts file on each node such as:
|
1 2 3 4 5 |
192.168.1.10 zkserver1.knowm.org zkserver1 192.168.1.11 nimbus1.knowm.org nimbus1 192.168.1.12 slave1.knowm.org slave1 192.168.1.13 slave2.knowm.org slave2 |
Add it to all the nodes and make sure they can all talk to each other using ping or similar.
|
1 2 |
sudo nano /etc/hosts |
Cluster Topology 2
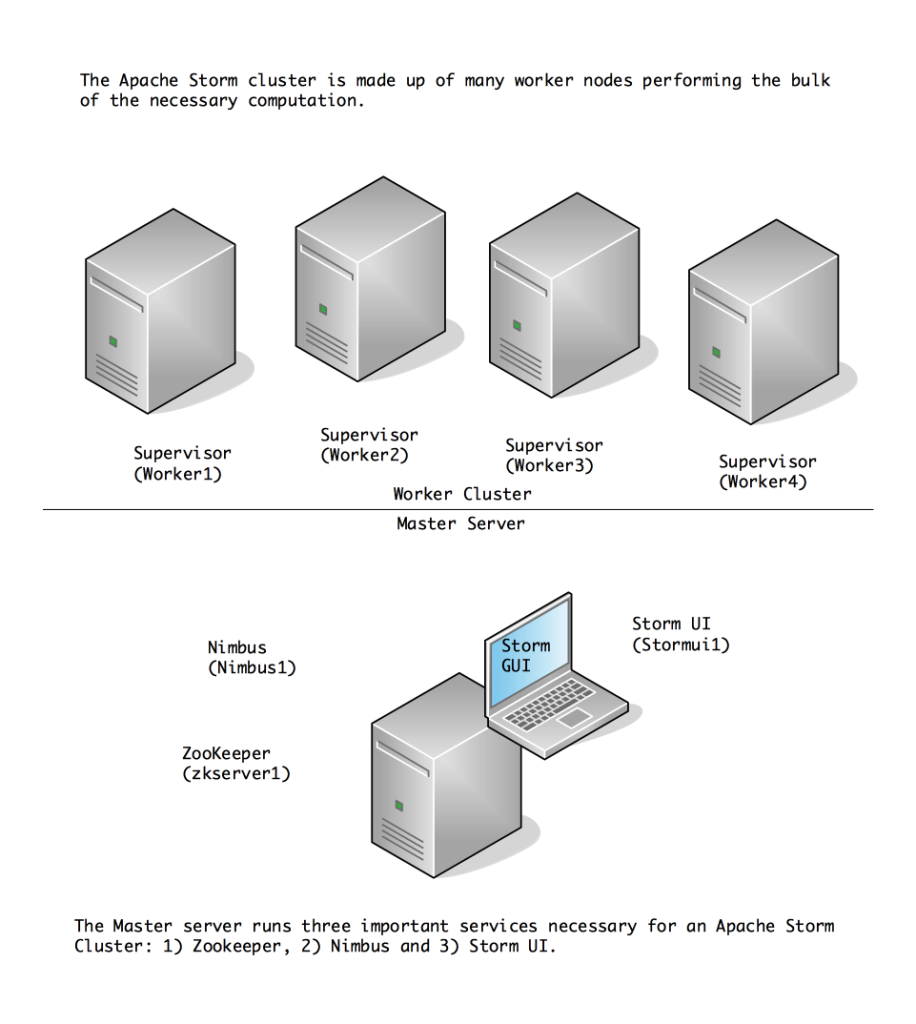
In the following cluster topology, Zookeeper, Nimbus and Storm UI are installed and running on a single machine.
A sample hosts looks like this:
|
1 2 3 4 5 6 7 8 |
192.168.1.40 zkserver1.knowm.org zkserver1 192.168.1.40 nimbus1.knowm.org nimbus1 192.168.1.40 stormui1.knowm.org stormui1 192.168.1.41 worker1.knowm.org worker1 192.168.1.42 worker2.knowm.org worker2 192.168.1.43 worker3.knowm.org worker3 192.168.1.44 worker4.knowm.org worker4 |
Java
Java needs to be installed on all hosts. Repeat the instructions on all hosts in the cluster.
Install Java the Easy Way
If you are installing on a normal Ubuntu distribution on x86 architecture, the following will get you running Java 8 quickly.
|
1 2 3 4 5 6 7 |
sudo add-apt-repository -y ppa:webupd8team/java sudo apt-get update echo debconf shared/accepted-oracle-license-v1-1 select true | sudo debconf-set-selections echo debconf shared/accepted-oracle-license-v1-1 seen true | sudo debconf-set-selections sudo apt-get -y install oracle-java8-installer java -version |
Install Java the Hard Way
If you are installing on Linaro or an an ARM-based architecture, the above easy method may not work. In my case, I wanted the Oracle HotSpot JDK for ARM. Other downloads for different systems can be found here. Make sure to adjust the following code snippets to correspond to the latest Java release!
|
1 2 3 4 5 6 7 8 |
sudo mkdir -p /usr/lib/jvm/java-8-oracle-arm cd /usr/lib/jvm/java-8-oracle-arm sudo wget --no-cookies --no-check-certificate --header "Cookie: gpw_e24=http%3A%2F%2Fwww.oracle.com%2F; oraclelicense=accept-securebackup-cookie" "http://download.oracle.com/otn-pub/java/jdk/8u51-b16/jdk-8u51-linux-arm-vfp-hflt.tar.gz" sudo tar zxvf jdk-8u51-linux-arm-vfp-hflt.tar.gz sudo update-alternatives --install "/usr/bin/java" "java" "/usr/lib/jvm/java-8-oracle-arm/jdk1.8.0_51/bin/java" 1 sudo update-alternatives --install "/usr/bin/javac" "javac" "/usr/lib/jvm/java-8-oracle-arm/jdk1.8.0_51/bin/javac" 1 |
Followed by:
|
1 2 3 |
sudo update-alternatives --config java sudo update-alternatives --config javac |
, and choose the desired installation.
Finally, check that Java was installed correctly:
|
1 2 |
java -version |
Zookeeper Node
Setting up a ZooKeeper server in standalone mode is straightforward. The server is contained in a single JAR file.
By the way, if you run into problems with your Zookeeper installation, check out How To Debug an Apache Zookeeper Installation.
Storm uses Zookeeper for coordinating the cluster. Zookeeper is not used for message passing, so the load Storm places on Zookeeper is quite low. Single node Zookeeper clusters should be sufficient for most cases, but if you want failover or are deploying large Storm clusters you may want larger Zookeeper clusters.
A Few Notes About Zookeeper Deployment
It is critical that you run Zookeeper under supervision, since Zookeeper is fail-fast and will exit the process if it encounters any error case. The way I set up supervision is to run Zookeeperd, which automatically respawns if the service fails. It is also critical that you set up a cron to compact Zookeeper’s data and transaction logs. The Zookeeper daemon does not do this on its own, and if you don’t set up a cron, Zookeeper will quickly run out of disk space. See here for more details.
Install and Configure
|
1 2 3 |
sudo apt-get install zookeeperd sudo nano /etc/zookeeper/conf/zoo.cfg |
|
1 2 3 4 5 6 7 8 |
# set the following: tickTime=2000 dataDir=/var/lib/zookeeper clientPort=2181 # Enable regular purging of old data and transaction logs every 24 hours autopurge.purgeInterval=24 autopurge.snapRetainCount=3 |
Explanation of Parameters
- tickTime
- the basic time unit in milliseconds used by ZooKeeper. It is used to do heartbeats and the minimum session timeout will be twice the tickTime.
- dataDir
- the location to store the in-memory database snapshots and, unless specified otherwise, the transaction log of updates to the database.
- clientPort
- the port to listen for client connections
The last two autopurge.* settings are very important for production systems. They instruct ZooKeeper to regularly remove (old) data and transaction logs. The default ZooKeeper configuration does not do this on its own, and if you do not set up regular purging with those parameters, ZooKeeper will quickly run out of disk space. Alternatively, you can set a cron job to run ‘PurgeTxnLog’, which does the same purging. I explain how to use that below…
Control
|
1 2 3 |
sudo start zookeeper sudo stop zookeeper |
Test Restart of Service
|
1 2 3 4 |
ps aux | grep zookeeper sudo kill {pid} ps aux | grep zookeeper |
Test Start of Service on Reboot
|
1 2 3 |
sudo shutdown -r now ps aux | grep zookeeper |
Apache Storm Nimbus, UI, Worker Nodes
On any node running either Nimbus, UI or as a worker, we install Storm and run the appropriate option: nimbus, ui or supervisor
Create storm user
|
1 2 3 4 5 6 |
sudo adduser --system storm sudo groupadd storm sudo usermod -a -G storm storm sudo chown -R storm:storm /home/storm sudo chmod 775 /home/storm |
Download and Unpack
Go to https://storm.apache.org/downloads.html and click on download link to find a valid mirror url
|
1 2 3 4 |
cd /home/storm sudo wget http://mirror.23media.de/apache/storm/apache-storm-0.9.5/apache-storm-0.9.5.tar.gz sudo tar -xvzf apache-storm-0.9.5.tar.gz |
Configure for Cluster
|
1 2 |
sudo nano /home/storm/apache-storm-0.9.5/conf/storm.yaml |
Paste the following text, save and exit.
|
1 2 3 4 5 |
########### These MUST be filled in for a storm configuration storm.zookeeper.servers: - zkserver1 nimbus.host: nimbus1 |
Nimbus
Test run:
|
1 2 3 |
sudo nohup /home/storm/apache-storm-0.9.5/bin/storm nimbus > /dev/null 2>&1 & ps aux | grep storm tail -f /home/storm/apache-storm-0.9.5/logs/nimbus.log |
Create Upstart Script for nimbus
|
1 2 |
sudo nano /etc/init/nimbus.conf |
Paste the following text, save and exit.
|
1 2 3 4 5 6 7 8 9 10 11 12 13 14 15 16 |
author "Tim Molter" description "start and stop storm nimbus" start on runlevel [2345] stop on runlevel [^2345] console log chdir /home/storm setuid storm setgid storm respawn # respawn the job up to 20 times within a 5 second period. respawn limit 20 5 exec /home/storm/apache-storm-0.9.5/bin/storm nimbus |
Create Upstart Script for ui
|
1 2 |
sudo nano /etc/init/ui.conf |
Paste the following text, save and exit.
|
1 2 3 4 5 6 7 8 9 10 11 12 13 14 15 16 |
author "Tim Molter" description "start and stop storm ui" start on runlevel [2345] stop on runlevel [^2345] console log chdir /home/storm setuid storm setgid storm respawn # respawn the job up to 20 times within a 5 second period. respawn limit 20 5 exec /home/storm/apache-storm-0.9.5/bin/storm ui |
Create Upstart Script for supervisor (Worker)
|
1 2 |
sudo nano /etc/init/supervisor.conf |
Paste the following text, save and exit.
|
1 2 3 4 5 6 7 8 9 10 11 12 13 14 15 16 |
author "Tim Molter" description "start and stop storm supervisor" start on runlevel [2345] stop on runlevel [^2345] console log chdir /home/storm setuid storm setgid storm respawn # respawn the job up to 20 times within a 5 second period. respawn limit 20 5 exec /home/storm/apache-storm-0.9.5/bin/storm supervisor |
Control for Nimbus, UI, Supervisor
|
1 2 3 4 5 6 7 |
sudo start nimbus sudo stop nimbus sudo start ui sudo stop ui sudo start supervisor sudo stop supervisor |
Cloning
If you are cloning HD or SD cards, be sure to delete the storm-local directory before cloning. This will clear local data and prevent problems of Storm only registering one of the supervisor instances.
Run a Test Storm Topology
Running the storm jar command on the nimbus1 host we can run an example Storm topology that comes packed with the Storm installation. The storm-starter example topology is part of the main Storm project and the source code is available on GitHub. The following command will start the sample topology called ExclamationTopology with the name exclamation-topology provided as the first argument.
|
1 2 |
/home/storm/apache-storm-0.9.5/bin/storm jar /home/storm/apache-storm-0.9.5/examples/storm-starter/storm-starter-topologies-0.9.5.jar storm.starter.ExclamationTopology exclamation-topology |
After a short delay you will see something like:
|
1 2 3 4 5 6 7 8 9 |
2938 [main] INFO backtype.storm.StormSubmitter - Jar not uploaded to master yet. Submitting jar... 3023 [main] INFO backtype.storm.StormSubmitter - Uploading topology jar /home/storm/apache-storm-0.9.5/examples/storm-starter/storm-starter-topologies-0.9.5.jar to assigned location: storm-local/nimbus/inbox/stormjar-3eb57454-e852-4034-aea3-d121cb79dec3.jar Start uploading file '/home/storm/apache-storm-0.9.5/examples/storm-starter/storm-starter-topologies-0.9.5.jar' to 'storm-local/nimbus/inbox/stormjar-3eb57454-e852-4034-aea3-d121cb79dec3.jar' (3248678 bytes) [==================================================] 3248678 / 3248678 File '/home/storm/apache-storm-0.9.5/examples/storm-starter/storm-starter-topologies-0.9.5.jar' uploaded to 'storm-local/nimbus/inbox/stormjar-3eb57454-e852-4034-aea3-d121cb79dec3.jar' (3248678 bytes) 3559 [main] INFO backtype.storm.StormSubmitter - Successfully uploaded topology jar to assigned location: storm-local/nimbus/inbox/stormjar-3eb57454-e852-4034-aea3-d121cb79dec3.jar 3560 [main] INFO backtype.storm.StormSubmitter - Submitting topology exclamation-topology in distributed mode with conf {"topology.workers":3,"topology.debug":true} 5994 [main] INFO backtype.storm.StormSubmitter - Finished submitting topology: exclamation-topology |
List Running Topologies
You can ask Storm to list the running topologies:
|
1 2 |
/home/storm/apache-storm-0.9.5/bin/storm list |
And you should see something like this:
|
1 2 3 4 5 |
6965 [main] INFO backtype.storm.thrift - Connecting to Nimbus at nimbus1:6627 Topology_name Status Num_tasks Num_workers Uptime_secs ------------------------------------------------------------------- exclamation-topology ACTIVE 18 3 725 |
View Running Topologies in Storm UI
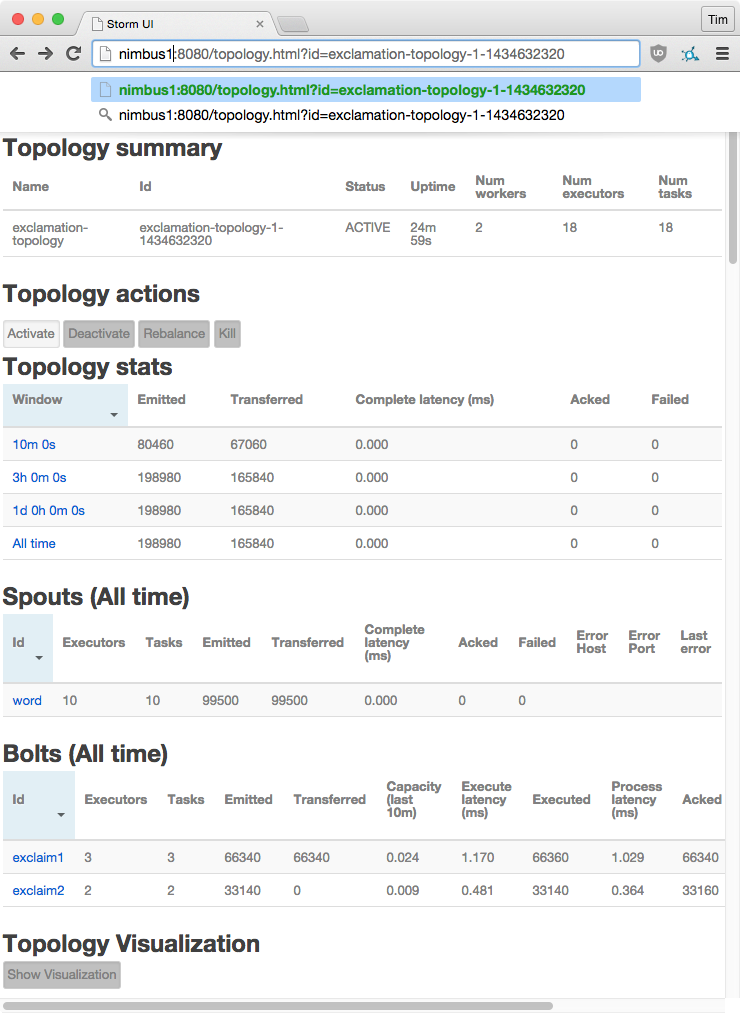
Of course, since Storm-UI was installed on the nimbus1 host, we can view the deployment in the web browser at http://nimbus1:8080. For an explanation of the Storm-UI web interface, I recommend an excellent overview called “Reading and Understanding the Storm UI [Storm UI explained]” at malinga.me – http://www.malinga.me/reading-and-understanding-the-storm-ui-storm-ui-explained/.
Stop a Running Topology
There are a few options for stopping a running Storm topology. You can either do it from the Storm-UI web interface or you can run:
|
1 2 |
/home/storm/apache-storm-0.9.5/bin/storm kill exclamation-topology |
That’s a Wrap
After struggling to understand how to deploy an Apache Storm cluster and struggling to find good instructions on how to do it, the above instructions document what I ended up doing. I will update this article as I come across any gotchas or important changes or additions. Did this article help you? What’s your favorite way to install and deploy a Storm cluster? Thanks for reading!
References
- A good but outdated Apache Storm installation guide – http://www.michael-noll.com/tutorials/running-multi-node-storm-cluster/
- Apache Storm storm-starter code on GitHub – https://github.com/apache/storm/tree/master/examples/storm-starter
- A great Storm-UI explanation – http://www.malinga.me/reading-and-understanding-the-storm-ui-storm-ui-explained/
- Apache Storm’s official documentation – https://storm.apache.org/documentation/Documentation.html
- Apache Storm’s topology tutorial – https://storm.apache.org/documentation/Tutorial.html
- Oracle Java x86 downloads – http://www.oracle.com/technetwork/java/javase/downloads/jdk8-downloads-2133151.html
- Oracle Java ARM downloads – http://www.oracle.com/technetwork/java/javase/downloads/jdk8-arm-downloads-2187472.html
- More info on configuration – http://zookeeper.apache.org/doc/r3.3.3/zookeeperAdmin.html#sc_configuration
- Standalone mode – https://zookeeper.apache.org/doc/r3.3.2/zookeeperStarted.html#sc_InstallingSingleMode
- ZooKeeper Cluster (Multi-Server) Setup – http://myjeeva.com/zookeeper-cluster-setup.html





4 Comments
anon
Hi Tim,
I tried this on ubuntu 14.04, and thanks first for writing this up. I’ve been looking for clear instructions for some time.
First, I couldn’t cd into /var/lib/zookeeper/log and for some reason isn’t created.
Second, when I try running the exclamation topo, I get:
Exception in thread “main” org.apache.thrift7.transport.TTransportException: java.net.ConnectException: Connection refused
I tried looking up how to fix this, but am not sure where the problem lies. Did everything else and runs fine on each VM. Maybe a problem with logging on log4j? I saw some error about not initialized properly.
Thank you.
Tim Molter
I’ve seen that exception before when Nimbus wasn’t running or the IP address was not what I had set in the hosts file. The IP address can change if you’re using DHCP and they’re getting re-assigned after a reboot or similar situation. I’m not sure why the log directory isn’t being created.
Lutong Yin
great article, thank you!
Rajesh Gheware
Great Article. Thank you!