 This blog post takes you through the steps you need to take to get your Java artifacts (Jars, JavaDocs, Sources, etc.) uploaded to Maven Central. In a nutshell, the main steps are required: 1) Create your JIRA account and create a new project ticket declaring your personal or business namespace, 2) create an account on Sonatype’s Nexus platform, 3) create GPG keys for signing your artifacts, 4) prepare your project and 5) deploy the artifacts to Maven Central. First off, here are the main references you will need:
References
http://central.sonatype.org/pages/ossrh-guide.html#deployment
http://central.sonatype.org/pages/working-with-pgp-signatures.html
http://central.sonatype.org/pages/releasing-the-deployment.html
Sonatype Jira Account
Follow the instructions in the first reference, under the section titled “Initial Setup”, setting up a Jira account and registering your namespace (Create a New Project ticket). You can use this namespace for deploying multiple projects and you only need to perform this manual process once. Just fill in the online form requesting something like: “Please setup our namespace: org.knowm!”. You will get an email response within a day or two saying that it has been completed. The Jira ticket will be updated with a message like this:
|
1 2 3 4 5 6 7 8 |
Configuration has been prepared, now you can: Deploy snapshot artifacts into repository https://oss.sonatype.org/content/repositories/snapshots Deploy release artifacts into the staging repository https://oss.sonatype.org/service/local/staging/deploy/maven2 Promote staged artifacts into repository 'Releases' Download snapshot and release artifacts from group https://oss.sonatype.org/content/groups/public Download snapshot, release and staged artifacts from staging group https://oss.sonatype.org/content/groups/staging Please comment on this ticket when you promoted your first release, thanks |
Sonatype Nexus Account
While signing up for the Jira account, you should have also been automatically signed up for an account on Sonatype’s Nexus system with the smae username and password. Go ahead and try to log in at https://oss.sonatype.org/. Nexus is the web application you use to manually deploy your artifacts to Maven Central.
GPG Keys for Artifact Signing
You need GPG keys to sign your artifacts. On a Mac you can use GPG Tools, one Windows GnuPG or on Linux with the CLI tool gpg or gog2. You will need to pick a passphrase and use it later during artifact deployment. Make sure to create a key corresponding to the email address you signed up for a Sonatype account with.
Prepare your Project
The pom in your project needs to have a minimum set of properties and plugins configured otherwise you will get errors when deploying. To see a working pom, check out Knowm’s XChange or XChart projects. The plugins needed are maven-gpg-plugin, maven-source-plugin, maven-release-plugin, and maven-javadoc-plugin.
Settings.xml
When running the mvn release:perform command later to deploy your artifacts to Sonatype’s nexus, the Maven build needs access to the Nexus server’s URL as well as you account login information. This is most easily accomplished by adding the credentials to your ~.m2/settings.xml file like this:
|
1 2 3 4 5 6 7 8 9 10 11 12 13 |
<servers> <server> <id>sonatype-nexus-snapshots</id> <username>username</username> <password>password</password> </server> <server> <id>sonatype-nexus-staging</id> <username>username</username> <password>password</password> </server> </servers> |
The sonatype-nexus-snapshots and sonatype-nexus-staging keys need to match the entries for distributionManagement in the project’s pom.xml:
|
1 2 3 4 5 6 7 8 9 10 11 12 13 |
<distributionManagement> <snapshotRepository> <id>sonatype-nexus-snapshots</id> <name>Sonatype Nexus Snapshots</name> <url>http://oss.sonatype.org/content/repositories/snapshots</url> </snapshotRepository> <repository> <id>sonatype-nexus-staging</id> <name>Nexus Release Repository</name> <url>http://oss.sonatype.org/service/local/staging/deploy/maven2/</url> </repository> <downloadUrl>https://oss.sonatype.org/content/groups/public/org/knowm/xchart</downloadUrl> </distributionManagement> |
Deploy the artifacts to Maven Central
At this point you’ve already gotten a your namespace on Maven Central, a Sonatype Nexus account, setup your project pom file, and got your PGP keys setup on your machine. Now to upload your non-snapshot releases to Maven Central, you need to run some Maven commands from the CLI. Make sure you have Git installed on your machine for this too.
The following Maven commands work for multi-module Maven projects as well as single-jar projects. You’ll need to adapt these commands to your specific project. Here are the CLI commands I ran to release XChange version 1.3.0…
Tip!
Leave the -SNAPSHOT in your pom.xml. The release plugin removes it and increments to the next snapshot version for you automatically. It also tags the commit for you too.
First Do a Dry Run
note: replace “xchange” with your own artifactId, replace 1.3.0 with your current version.
|
1 2 3 4 |
mvn clean mvn release:clean mvn --batch-mode -Dtag=xchange-1.3.0 -DreleaseVersion=1.3.0 -DdevelopmentVersion=1.3.1-SNAPSHOT -DdryRun=true release:prepare mvn release:rollback |
Then Do the Real Thing
note: replace “xchange” with your own artifactId, replace 1.3.0 with your current version.
|
1 2 3 |
mvn release:clean mvn --batch-mode -Dtag=xchange-1.3.0 -DreleaseVersion=1.3.0 -DdevelopmentVersion=1.3.1-SNAPSHOT release:prepare mvn release:perform -Darguments="-Dgpg.keyname=XXXXX -Dgpg.passphrase=XXXXXXXXXXX" |
The Final Stretch
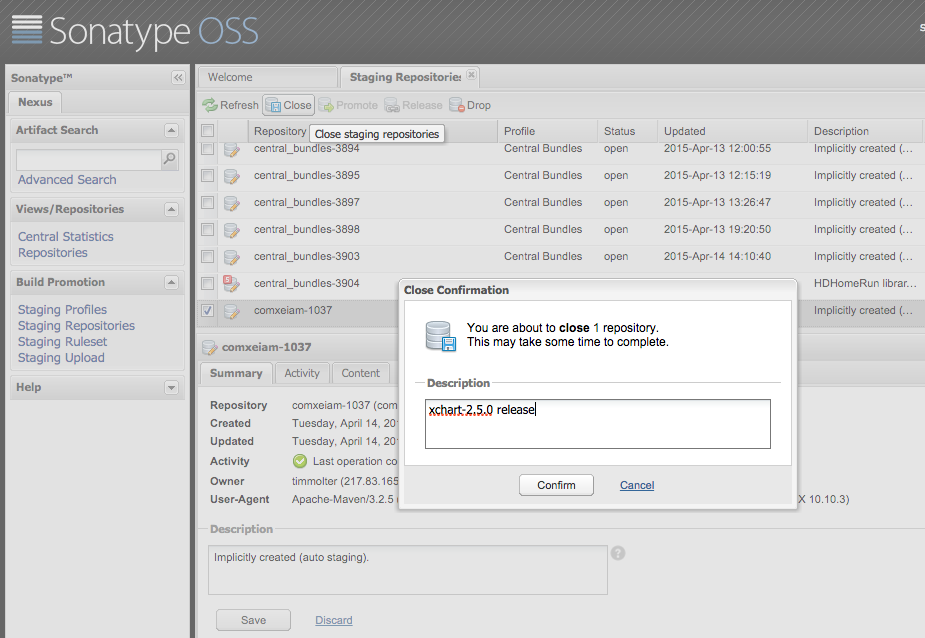
The last thing to do now is to use the Sonatype web interface to release the artifacts. Log in to Sontaype Nexus and follow the instructions here. A full deployment to Maven Central requires two main steps: closing and releasing. First you close the project’s “repository” and then you release it. Between the two steps you are allowed and encouraged to manually download the staged artifacts and test them. After closing the repository, you’ll need to hit the refresh button next to the “close” button in order for the “release” button to become activated. It may take a minute for the system to allow releasing so be patient.
Done!
After a couple minutes of waiting, your artifacts will be available on Maven Central. I found that it takes even longer for them to be available on search.maven.org, but as soon as they show up in the repository, you and others can access the artifacts by adding a dependency to the pom.xml file in a Maven project.







Leave a Comment